Complete Tri

Best eBikes Under $2,000

riding ebikes

E-bikes are more popular than ever! E-bikes help people ride further, faster, make riding more fun, and help people get on a bike who otherwise couldn’t. And with more manufacturers making e-bikes than ever before, the cost of an e-bike has become much more accessible, as well.  We are going to take a look at the three best e-bikes under $2000. We’ll talk about each bike and who it’s best for. We’ll also talk about some important information, such as battery life and bike design so you can choose the best e-bike for your ride. Let’s get started.   Best eBikes Under $2000 Electric Bike Company Model R This is quickly becoming my favorite e-bike in the sub-$2,000 range. The Electric Bike Company’s Model R is a great all-around bike for the money, and by buying direct from EBC we think you get a better value than you might when buying a bike through traditional retail channels, given the markups needed to make them profitable. Electric Bike Company only sells direct. They have the shipping process that enables the bike to arrive fully-built, in a rugged shipping box on a pallet. Basically, the bike shows up in your driveway ready for a quick charge, and then you can ride it. Pros Powerful 500 watt motor Step-through design that made it perfect for someone who was looking for an easy bike to get started on Seamless shipping process Bike arrives fully built, ready to go Ability to customize when ordering Cons Local dealerships might be less familiar with them if you need service, but that probably isn’t a bike problem A little lead time is needed to get the bike given that it is custom built for you and then shipped Find it here Coop City e2.1 Coop City e2.1 is easy and comfortable to ride. You’ll find it has a multimode pedal assist, an upright riding position that still allows for some aggressiveness when you need it, and a factory a rear rack. Offers Class 1 pedal assist up to 20mph  Up to 50 miles of pedal assist 418-watt hour battery capacity  Bike weight of 50.5 pounds  Low stand-over height  Upright riding position with adjustable stem  Three pedal assist modes Front suspension  Shimano hydraulic brakes  The rear rack can accommodate a kid carrier, pannier, or trunk bag Front and rear lights run on the battery  The total weight limit is 300 pounds   We love this bike for daily commutes and fun weekend rides. The rack holds up to 59 pounds, so it’s suitable for a child seat or to get groceries, making it perfect for commutes or family fun rides. The upright position with an adjustable stem means you can adjust the height of the handlebars to whatever comfort level you need.  Pros Coop is REI’s inhouse brand, so if you live near a store you can get easy access to service and parts Best battery assist life of the 3 options Good size range. Sizes accommodate both larger and smaller riders Cons Some riders might be looking for a more aggressive, mountain-bike fit  Find it here Cannondale Treadwell Neo2 This bike is lightweight and fun to ride. Since it is lightweight and snappy, this is a great bike if you want to be able to turn off the battery and get a little extra exercise. And the rear hub drive is barely visible, so it won’t be evident that you’re riding an e-bike, and the upright position makes it very comfortable no matter how you ride.  Plus, Cannondale is one of our favorite bike brands for road bikes and gravel bikes, so they likely figured out eBikes too. Offers class 1 pedal assist up to 20 mph Up to 47 miles of pedal assist per charge  250 Wh battery  Just 34 lbs Free Cannondale app works with the bike to track speed, distance, calories, and reminds you of service needs Great for in-town rides and crowded streets 7-speed drivetrain / Tektro mechanical disc brakes This bike is great for anyone looking to use their e-bike for both exercise and assisted riding. It’s the perfect bike for Sunday brunch and ice cream Sunday runs! You can do unassisted interval training and get your workout in, too.  Pros Super lightweight as far as ebikes go Concealed battery – bike looks like a normal bike Cannondale brand — timeless and trusted Most drivetrain range of the 3 options Cons Stock tires are not that tough. May want to upgrade if riding on rough surfaces. Find it here Wing Freedom Street If rough roads are on your horizon, the Freedom Street by Wing is a great choice. It has extra-wide puncture-resistant tires, making your ride feel smoother and lessening your chances of a flat tire.  Up to 43-mile range on a single battery  Up to 20mph pedal assist Optional second battery for an extra 25 miles of run time.  A brushless gear hub motor gives you plenty of power for urban streets and challenging hills  Hydraulic disc brakes for excellent stopping power This bike is perfect for in-town roads. If you’ve got a long urban commute or some steep hill climbs, you’ll love the extra distance you can get from the dual battery.  Pros Easy online buying and shipping process Lightweight for an eBike Anti-theft system Cons Newer brand (but it doesn’t concern us) Battery life is in the expected range but on the short side Aventon Aventure E-Bike Rugged and comfortable is the name of the game with the Aventure E-Bike. It’s got plenty of tech, a bit of sophistication, and terrific handling.  You have probably seen a lot of Aventon bikes around, they have established themselves as a market leader. One of their other models, the 500, is one of our favorite ebikes for older riders too. Front suspension fork Extra cushy fat tires Exceptional handling Built in fenders  Integrated front and rear lights  Backlit LCD Class II Ebike, but can be reconfigured to be Class III  Top Speed of 28mph  … Read more

How Far Should Your Seat Post be Out of the Seat Tube?

seat tube bike

Bikes are often sized in relation to the length of the seat tube. However, the length of your seat tube – or the amount of seat post that sticks out of your bike frame – really depends on your body shape and size. Taller people may need more seat post to stick out of their frame, while shorter people need less. Other variables make a huge difference, too, such as your bike’s frame (a frame that is too small for you means you will be maximizing the seat post length), the type of bike saddle you use, and other things. How Far Is Too Far? First, if you look at your seat post, it should have a marking that tells you how much of the tube can safely stick out of the frame. If you raise your seat higher than the recommended amount, your bike simply won’t be safe to ride. If this is the case, then your bike frame is most likely too small, and you need a larger bike. However, you may be able to swap out your seat post for a longer one. For example, the United States Consumer Product Safety Commission explains that the seat post must have a mark that shows the minimum depth for the post to be inserted into the frame: two times the diameter of the post. Seat Post Length and Frame Size On the other hand, if you don’t have any seat post sticking up out of the frame, then your bike is probably too big for you. You shouldn’t be riding with the seat all of the way down. For typical road bikes, you’ll see that the seat is at least an inch higher than the handlebars. Saddle Height and Your Seat Post One of the main reasons for adjusting your seat post is to get the right knee angle when you are pedaling. A simple way to check your saddle height is to sit on your bike without your bike shoes. Also, you may want to have someone hold the bike for you or put the bike on your trainer so you won’t fall. Put your heel on the bike’s pedal directly over the spindle and place your pedal in the 6:00 position. Your leg should be straight without having to strain to reach the pedal. This will put you in the ballpark of getting the right seat height, and you’ll have the right amount of seat post sticking out. From there, you can fine tune the seat height to make it more comfortable. Do You Need a Different Seat Post? You probably won’t need to swap out your seat post for a different one because there is usually plenty of room for you to extend the one that came with your bike. However, if you do need a longer post, you can purchase posts anywhere from 75 to 400mm in length. Make sure your post is long enough to fit you. In some cases, you won’t need a longer post, but you might need a different angle. For example, most seat posts are straight, but this may put you too far backward on the bike if you have the post extended pretty far or too far forwards if it is lower. In this case, you might want to consider a seat post with a different offset which will move the seat more forwards or backward in relation to the pedals of the bike. How Do I Know When my Bike Seat Post is Perfect? A well-fitted bike seatpost will give you a combination of comfort and power, with a nice smooth pedal stroke. You will want to get out of the saddle at times, so the seat should be in a position that lets you seamlessly do that.  At the same time, you want to be able to ride for long stretches in the saddle, like during an endurance gravel race or a century ride. If you use a power meter, it can be a good idea to compare your power with the seat post at different lengths. But once you find a geometry that works well for you, mark it, measure it down to the millimeter, and then sue that geometry on every bike you own.

Common Bike Shop Costs

Your bike will likely need regular maintenance and repairs. Your options are to either have some bike tools at home to do the basics, or find a good bike shop to help you out. But what common costs are associated with bike ownership? While prices and services will definitely vary from shop to shop, below we cover some of the most common (and a few uncommon) bike services you may need plus their potential costs. Bike Tune-Up Usually Between $50 and $80 You should probably get a bike tune-up once a year, if not more often. A regular bike tune-up will help keep it running smoothly and should help prevent some costly repairs and safety problems. Although not all bike tune-ups are the same, most include a few standard items: Check bike tire pressure Adjust gears, brakes, and cabling Clean and lubricate the chain Clean the bike Adjust headset and bottom bracket Check and tighten all screws and bolts Lubricate any moving parts Check the drivetrain Do a safety check If the bike needs new cabling and the hubs need to be repacked, the price could go up to as much as $225. If you have a full-suspension mountain bike or an e-bike, the cost may be a little bit more because there are additional parts to adjust. For example, your suspension fork may need to be tuned for your body weight. This type of adjustment requires extra time and materials. Factors that affect the cost of add-on repairs associated with a tune-up are the number of miles you put on your bike, the type of riding you do, and if you use the bike indoors on a trainer. Indoor riding causes a lot of sweat to drip on components, which causes faster corrosion. If you don’t keep your bike chain well serviced, you could end up damaging the cassette and chain ring, which would cost you much more in repairs. Cost to Assemble a Bike $60 and up If you purchase a new bike and have it shipped directly to you, you may need help assembling it. Some bike shops charge by the hour for this service, while others give you a flat fee. For example, the VeloShop in Emmaus, Pennsylvania charges $85 for a basic bike build. There may be additional charges if you need extra parts or adjustments. On the other hand, if they are building a bike for you from a frame that you purchased, it will cost you $75 per hour plus parts. A children’s bicycle or a BMX bike may be a little bit less. Cost to Disassemble and Pack a Bike for Shipping $60 and Up If you are going to travel or selling your bike, you will experience the world of shipping a bike.  It can be good to have your local bike shop to disassemble the bike for you. In this case, it will cost around $60, according to Bill’s Bike and Snow in the Idaho Falls area. This price doesn’t include the cost of shipping, just the cost to take apart and box up the bike. Cost to True a Bike Wheel Usually Between $20-$40 Unless Parts are Needed If you hit a bump or a pothole, you might find your wheel is out of true. In other words, your wheel just isn’t straight anymore. An out-of-true wheel can make braking and steering difficult. It can also make your ride very uncomfortable. If your spokes just need to be adjusted to bring your bike back into true, this will probably cost you around $20 for a basic wheel truing at a place like The Twisted Cog Bike Shop in Phoenixville, Pa. The repair may cost you more if your wheel needs parts – such as new spokes. While it doesn’t seem like that hard of a repair, truing a bike wheel is actually a hard thing to do at home. Cost to Powder Coat a Frame $240 and Up If you want to update your bike frame, you may want to consider getting it powder-coated. This gives you a strong, durable finish. Powder coating a frame can get expensive, depending on how intricate of a design you are looking for. The Goody Bros break their prices down for each step. For example, the cost to disassemble the bike is at least $80, depending on the bike. The cost to sand and prep the bike is $50, and the cost to powder coat the frame and fork one color is $110, not including the cost of the powder and materials. So for a basic painting of a steel bike, you’ll have a cost of a minimum $240.However, if you have special effects, multi-colors, or other specifications, you’ll have to get a personal quote depending on what exactly you want to be done. A full-suspension frame requires a lot more disassembly and detail work. It will be a minimum of $250 for the coating alone. Other Services Many bike shops will provide you with a menu of standard services and prices so you can be prepared for your repair costs. However, if you need services for your bike that aren’t listed on their menu, they may charge you a per hour fee based on what you need. This is, on average, $75 per hour plus the cost of parts.  

Can you retrofit disc brakes on a non-disc bike frame?

Mountain bikers have known for a long time that disc brakes have superior stopping power under adverse conditions over rim brakes. Hydraulic disc brakes will magnify the stopping force of your hands, while disc rotors are better at stopping even in mud, wet, and dirt. The technology is trickling over into other riding disciplines, such as gravel and road. But what if you already have a bike you love that’s fitted with rim brakes or V-brakes? Can you retrofit disc brakes on a non-disc bike frame? Theoretically, you should be able to retrofit your bike with disc brakes.  It would definitely be one of the bike upgrades you would notice and appreciate on your rides. However, there are many reasons you probably don’t want to. In this article, we’ll take a look at what it would take to retrofit your rim brake bike with disc brakes and why it isn’t actually worth it. Reasons to Upgrade Your Bike to Disc Brakes Rim Brakes Rim brakes were the standard on bikes of all types for many years. When you squeeze the brake levers, the cable running to the brakes closes the brake pads around the rim of the wheel. The friction on the wheel from the brake pads slows the spinning of the wheel, thus slowing the bike. The problem with rim brakes is that they significantly limit the tire clearance you have on your bike. You can only fit a tire as wide as will fit inside the brakes. Rim brakes are more subject to not working as well in bad weather, and they wear down more quickly when it’s wet. Some say that the tire’s rim can heat up too much on steep descents and cause blowouts. So these are all excellent reasons to switch to disc brakes. Disc Brakes Disc brakes have a rotor that is attached to the wheel at the hub. The brake pads squeeze the rotor rather than the rim of the wheel. This gives you plenty more clearance for wider tires (as wide as your frames will allow), and the brakes handle better in bad weather. They also give you more stopping power with less hand strength. Keep in mind that while hydraulic disc brakes magnify your stopping power, mechanical disc brakes do not. With the popularity of gravel bikes, which need wider tires, disc brakes are the standard on all models. They have become the default on road bikes too, as buyers have come to expect them. Retrofitting Your Bike with Disc Brakes So while you can retrofit your bike with disc brakes, it isn’t a simple process because the bikes and brakes are so different. In order to convert your rim brake or V-brake bike to disc brakes, you’ll need to make some big changes and investments to your bike. Bike Frame First, the bike frame is different. Your rim brake frame holds the brakes to the bike at the apex of the fork, and the brakes are fitted around the rim. On a disc brake bike, the rotor is attached at the hub of the wheel, while the brakes are connected to the side of the fork. The frame of a disc brake bike, especially if it’s carbon, is layered and shaped differently because disc brakes apply stress to different parts of the bike frame. A rim brake frame simply isn’t created to withstand the different type of pressure from disc brakes, and this may cause premature frame damage and even injury. Brake Levers If you convert from rim brakes to hydraulic disc brakes, you’ll need new brake levers, cables, and hydraulic brake fluid for bikes. Forks You’ll have to replace the front fork of your bike with a fork that can accommodate the mounts needed to hold the brakes in place. This can be expensive, especially if you want a carbon fork to absorb some of the road chatter. Wheels and Hubs You’ll also have to get new wheels with disc brake hubs. Rim brake wheels are designed to withstand the pressure of the brake on the rims, but disc brakes need to attach at the hub. So the same wheels won’t work on a disc brake bike as you would use on a rim brake bike. Wheel sets are one of the most expensive parts of your bike. Rear Fork Conversion Kit Since you can’t just replace the rear fork of your bike, you’ll need a conversion kit that will attach rear disc brakes to the rear fork. And while some people do find success using these types of kits, they can be finicky, heavy, and hard to attach.While many home bike mechanics enjoy the project if they have the right bike shop tools on hand, it is not uncommon to spend four figures on the upgrade if you bring it in to a bike shop. For that price, you can purchase a pretty awesome brand-new bike already fitted with disc brakes. Retrofitting your bike with disc brakes is expensive, time-consuming, and probably not as safe as just investing in a new frame. So if you’re currently riding with rim brakes, relax and enjoy the ride! Rather than spending all the time and money to upgrade your bike, save your pennies to invest in a bike already outfitted with disc brakes. I recommend that you simply purchase a new or high-quality used bike, rather than taking on the very expensive task of retrofitting a bike.

How to Store a Bike in an Apartment

Live in an apartment? You’re likely short on space. So where on earth are you going to store your bike? We’ve collected 8 ideas for you to store your bike in an apartment! 1. Hang the Bike on a Clug (Wall Hook) A simple solution to storing your bike in an apartment is to use a wall hanging solution. For example, the Clug is a small u-shaped bracket that attaches to your wall with the included template, screws, and anchors. You can use it to store your bike either horizontally or vertically.  It is a very small, efficient, and easy to use bracket. Pros Inexpensive at around $21 Easy to use Doesn’t look cluttered or detract from your bike Cons You have to install it into your wall – you’ll need to find out if your landlord will allow you to do so You must get the correct size for your tires, so if you change tires often, this might not be the right system for you If not installed correctly, the Clug could easily pull out of the wall The Clug is best for lightweight bikes and anywhere you need a clean, clutter-free solution. 2. On a Bike Stand If you do your own bike work, you might already have a bike stand on hand. You can use your bike stand to store your bike up off the floor. Pros Your bike stand serves two purposes, saving money. It keeps your bike up off the floor and on display. Cons Not all bike stands are equally sturdy. Some bike stands have a wide footprint, so you’ll have to be careful not to trip on the feet. This option is best for someone who does their own bike work. 3. On Your Bike Trainer If you ride a trainer inside, a great place to store your bike is right on the indoor bike trainer! It doesn’t matter if it is a wheel-on or a direct-drive trainer. If the trainer is sturdy enough to hold you while you ride, it’s also sturdy enough to hold your bike safely when you aren’t. Granted, it can bit a bit of a hassle to keep re-installing your wheel if you use a direct-drive trainer. However, once you get good at it it only takes a minute. Pros A free solution if you already have a trainer Will keep your bike sturdy and safe Cons Trainers can take up a lot of space It may be difficult to take your bike on and off the trainer every time you want to ride. This is best for someone who rides both indoors and outdoors, and keeps their trainer setup all the time — perhaps in an out-of-the-way location with a bike mat underneath. 4. With Ceiling Hooks If you are short on floor space, you might consider storing your bike with ceiling hooks. Choose a sturdy beam to screw your two large C or S hooks, space them to line up with the middle of each wheel, and pre-drill the holes. You’ll want to make sure the hooks are sturdy enough to hold your bike and that they are coated so they don’t scratch up your frame. Alternatively, you can hang your bike on a wall using one hook as long as your put your hook into a stud. Pros Uses inexpensive and easy-to-find hooks Won’t take up precious floor space Cons You may not be permitted to drill into the wall or ceiling You’ll be storing the bike upside down – which can cause air bubbles in hydraulic brake bikes It may not be possible to lift a heavy bike – like an e-bike –  up to the ceiling This option is best for someone with a lightweight bike. 5. Disassembled and in a Closet If your landlord won’t permit you to drill hooks or attach brackets, you might need to resort to storing your bike in a closet. If your closet doesn’t have the space, you can disassemble it by removing the front and back wheels. Just loosen the skewer or maxle and remove the wheel. Replace the skewer. Unless you have rim brakes, be very careful not to squeeze the brake levers or you could dislodge the piston. Pros This storage solution doesn’t cost a thing You won’t waste floorspace if your apartment is small Cons It takes time to remove (and replace) the wheels You could damage your brake system if you aren’t careful You could get grease on your clothes if you store your bike alongside them Best for: A mechanically inclined cyclist. 6. On Your Balcony If you have a tiny apartment but you have a balcony, you could store your bike there. You should consider, however, covering it with a tarp or bike tent. Rain, snow, frigid temperatures, and the sun can all do a number of your bike’s paint, battery, and overall function. Pros Can be a cheap solution to living in a tiny space If your balcony is high up, your bike is less likely to get stolen Cons Your bike may be subjected to bad weather which can cause it to wear out sooner You may need to lock your bike to the balcony just to be safe Best for: someone who has no other options for bike storage. 7. Behind a Piece of Furniture If you have a large living room, you may want to simply store your bike behind the sofa. Pull the sofa away from the wall a few feet and slide your bike behind it. Your bike will be out of the flow of traffic and safely protected. Pros This is a free storage solution. You won’t need to hang your bike or drill holes into the walls or ceiling to protect it. Cons This won’t work in a small living space – you might not have enough room to move your sofa. You may get grease on your sofa if it’s too close to your bike. This choice is best … Read more

How to Use Strava Route Builder for Cycling

strava

Creating a route in Strava brings a bunch of benefits to your cycling: it gives me a rough estimate how far you’re going, how long it will take, and how it will meet your workout goals. You can even save your routes with your cycling friends! Start your Route Remember that you’ll need a paid Strava subscription to use the route builder. Open up Strava on your laptop or computer — the browser version can be a bit more user friendly than the app for some. Hover the arrow over the Explore tab and click on Create a Route. Strava may ask if it can use your current location. If you say yes, it will zoom in on your location so you can choose your starting point. For cycling, we find Strava to be the best cycling route builder of the options, although there is a loyal cycling following for an app called RideWithGPS too. Set Your Map and Route Preferences On the left-hand side, you’ll see your map and routing preferences. For example, you can select your sport, the fastest or most popular route, your elevation, and your surface preference. Below that, you can also select if you want Strava to show you: Points of interest (for example, local cafes or places to refuel) Your personal heatmap (the roads you ride on) Global heat map (the roads other people ride on) Segments Distance markers Miles or kilometers Map type If you select Global heatmap and points of interest, you can see where most cyclists travel, identify the best routes, and pick places to break. Strava will also give you some popular starting points. Add Your Start Point If you know your starting address, you can type it into the search bar and then click on it to show Strava that’s where you want to start. If you don’t know your starting point, you can look for Strava’s suggested start points or look around the map until you find one. Then you can add your other rest points. You can type in the address or search for a location. Strava will zoom in on the spot on the map and ask if you want to add it to the route. Then it will automatically fill in the roads from the most recent point using the most popular roads ridden by other cyclists. Select Your Endpoint Next, add your endpoint. If it’s the same as your start location, Strava will automatically fill in the roads. You might see that Strava has created an out-and-back route. If you want to change that, just hit the undo button. Then click on the road somewhere in between your start and end that you would like to follow on the return. You can let Strava fill in the rest, or you can add each road step by step by clicking on one road at a time. If you see a road you want to avoid, you can use your mouse to grab the road and pull it to a different one. Strava will automatically adjust the route. Check the Stats If you like the route, then look at the bottom of the screen. Make sure you are happy with the distance, elevation, approximate time, and surface type. If you are, then you are ready to save your route. Save your Route In the upper right-hand corner of the screen, click on the button that says save. A window will open up where you can name your route (required), give it a description (perhaps this Is your best friend’s birthday ride or an ice cream ride), and select whether you want to make it public or private. Of course, you’ll need to make the route public if you’re going to share it. Once you hit save, a new screen will open. This gives you a summary of your new route. You can now export it to your cycling computer, edit it, or even send it to a friend. For detailed instructions on how to send the route to your bike computer, look up the manufacturer’s directions. Every brand is a little different. Tips for Creating Better Strava Routes Use a Computer! The “Create a Route” tool on Strava is WAY easier to use on a computer than on a phone or tablet. Given the the intricacies of zooming and out while trying to gradually build a precise route, using your finger on a screen can be maddening. Strava will admit that their route builder tool is really meant to be used on a computer.  The user interface is much better that way. Undo/Redo If you entered a wrong road by mistake, you can use the undo/redo buttons in the upper right-hand corner to undo it. Reverse Route If you want to create a separate route for your return home, you can click on the parallel arrows in the upper right-hand corner of the route builder to easily reverse the route. Look it over carefully in case you need to make any adjustments. Reverse route can work great on those out-and-back routes, and ensures you only have to do the real thinking in one direction.  Routing the “back” part is a piece of cake. Manual Mode If your local roads aren’t up to date in Strava’s records, it might not recognize a stretch of road you want to use. If this is the case, you can switch to manual mode. However, Strava can’t guarantee that these are actual roads or trails, and the elevation is only an estimate. Always double-check your route. Occasionally, Strava may send you on major highways or roads that aren’t really safe if there isn’t a good option on your route. So you’ll want to look over your map and make any necessary adjustments before you finalize it. What I do is switch to manual mode for just the little bit that I need to go “off-script” in Strava, and then when the route is back on major roads I go off … Read more

Mountain Bikes vs. Fat Bikes

mtb vs fat bike tire

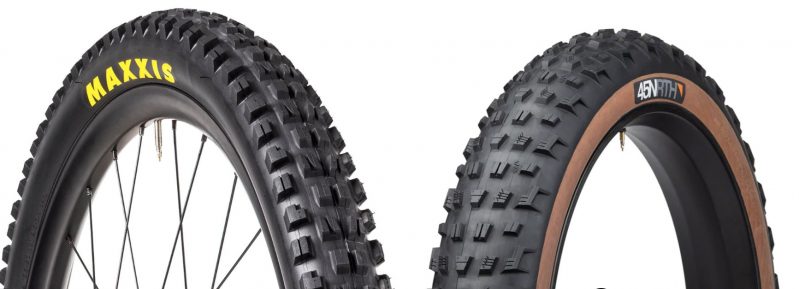
Mountain bikes were invented in the late 1970s. And although primitive fat bikes have been around much longer, they didn’t become popular until the modern fatbike showed up on the scene in the late 1980s. But what’s the difference between a mountain bike and a fat bike? In this article, we’re going to take a look at the difference between a mountain bike and a fat bike. First, we’ll explain the differences between the bikes and how you ride them. Then, we’ll give you an idea of how much they cost. But first, let’s look at what makes them each unique.  The Difference Between a Mountain Bike and a Fat Bike  A fat bike, also known as a fat tire bike, is a specialized off-road bike made to accommodate extra wide tires. Fat bikes were made to ride well in snow, sand, gravel, and mud. Mountain bikes, on the other hand, are also off-road bikes with wide tires. But the tires on a mountain bike aren’t as wide as a fat bike. Instead, they’re made to bomb down hills, ride over rocks, and hit the trails. So fat bikes were made for softer surfaces, while mountain bikes were made for harder terrain. Tires The most obvious difference you’ll notice between mountain bikes and fat bikes is the tires. Fat bike tires are typically 3.8″-5.2” wide (96-132mm). On the other hand, MTB tires typically measure 1.9”-2.6” wide (48-66mm). That’s such a big difference that fat bike tires will also need wider rims. In addition, fat bike tire pressure can be as low as 5 to 14 PSI, while mountain bikes are generally 22 to 35 PSI. The lower tire pressure disburses the weight more, so the bike won’t sink as deep in snow or sand.  Frame Because of the potential width of a fat tire, the fat bike needs to have lots of frame space to accommodate big tires.  You will see a frame designed with a wider flaring seat stay, chain stay, and fork.  Without these modifications, there would be a natural limiter on how wide a tire you can run.  A mountain bike, on the other hand, is built with a much more traditional frame design. Suspension Mountain bikes usually have suspension systems that help them grip the terrain and absorb bumps.  Not all have suspension, though.  “Hard tail” bikes don’t, and “Soft tail” bikes do.  However, fat bikes were made for softer surfaces, and they have such fat tires that they don’t typically have suspension systems.  Hubs A less noticeable difference between mountain bikes and fat bikes is the size of the hubs. The hub is the center part of the wheel that attaches the wheel to the bike frame. It allows the wheel to spin freely. Because a fat bike tires are so wide, the hub also has to be wide. Since the tires on a mountain bike are thinner, the hub can also be thinner.  Pedals This also affects the pedals. Sometimes called the Q Factor, this represents how far apart your pedals are from each other. On a mountain bike, the pedals are more in line with your hips. The pedals are typically farther apart on a fat bike than on a mountain bike. This may cause discomfort in your knees and hips over time.  On both fat and mountain bikes, riders typically go with SPD-style pedals and cleats. Brakes Both types of bikes typically have disc brakes. Disc brakes offer better stopping power in adverse conditions and allow for wider tires than rim brakes do. They both usually have flat bars, as well. Some mountain bikes will have very aggressive geometry, while others, along with fat bikes, will have a more upright and relaxed geometry.  Fat Bike Vs. MTB Comparison To get a bit more granular, here are some detailed specs and bike statistics to give you an idea of how fat and mountain bikes compare.   Fat Bike Mountain Bike  Tire Width 3.8 – 5.2 inch tires  1.9 – 2.6 inch tires  Tire Pressure  5 – 14 PSI tire pressure 22 – 35 PSI Suspension None Front and/or rear suspension on some Weight 33 to 36 pounds  28 to 34 pounds  Handlebars Flat bar Flat bar  Hubs  170 – 190 mm 142 mm  Typical Q Factor 200mm 170mm    How the Two Bikes Are Used Fat bikes excel at riding on soft surfaces. You can ride them in deep snow or soft sand. They’ll also ride well over loose gravel and even mud. If you are new to off-road riding, the big soft tires of a fat bike can be very forgiving, giving you extra traction and plenty of comfort. But fat bikes won’t ride fast, and they take a lot of effort to pedal. The wide soft tires have a lot of rolling resistance, the bikes are very heavy, and they don’t have a lot of gears for speed. Since the fat bike has a wide Q Factor, it can also use your muscles a little bit differently, which can make it harder to ride.  You can take a fat bike on the road if you really want to, but it will be much slower than your road bike friends and even slower than your mountain bike mates.  Since fat bikes are meant for softer surfaces, they don’t really have suspension systems. As a result, handling on a fat bike is slower and may feel laggy. This is ok because when you’re traveling in snow or sand, you don’t want to make any sudden changes in direction, or you might skid.  Mountain bikes, on the other hand, have wider, knobbier tires than a road bike but less so than a fat bike. They still have plenty of grip and soft tires, just not as much as a fat bike. MTBs are also made for off-roading, but they’re meant to accommodate harsher surfaces, such as rock gardens and roots. Mountain bikes need to be able to make quick changes in direction and … Read more

Tools Every Cyclist Should Own

bike mechanic tools

You don’t need an entire bicycle workshop to take care of your bike. But having a few essential tools on hand will help you do some basic bike maintenance and minor repairs, allowing you to fix things quickly and avoiding higher bike shop repair costs.  In addition, the right tools can help you salvage a ride after a minor mechanical issue or keep your bike riding smoothly on a daily basis. Many of these tools can stay right in your saddle bag so you can take them with you on a ride.  In this article, we’re going to talk about the 10 best tools a beginner or intermediate cyclist should keep on hand. We’ll give you a brief idea of how and when to use them and then talk about a few more advanced tools you may want to invest in, as well. Let’s get started.  Tools to Change a Bike Tire  Lucky for me, my first flat didn’t happen until I rolled right into my driveway, and I was able to change it in the comfort of my home. So hopefully, you won’t ever have to change a tire when you’re out on the road. But unfortunately, flats do happen, and it is better to be prepared to change a flat both on the road and at home.  Tire Pump Every cyclist needs a tire pump. Whether you have tubeless tires or tubed tires, you still need to check your tire pressure before every single ride. You’ll find the recommended tire pressure written on the sidewall of your tire. If you’re riding on hard, flat surfaces or you’re a heavier rider, stay towards the top end. And if you’re riding in the rain or are a lighter rider, you can stay towards the lower end. With a little practice, you’ll find that sweet spot of just the right tire pressure for you.  You’ll want a good quality floor-style pump to keep at home, but you might also want a mini-pump to keep on your bike or in your saddle bag so you can fix a flat tire if it happens on the road or trail. Tire Levers  Tire levers typically come in a pack of three. If you have a flat, you’ll need tire levers to get a tough tire off the rim to change the tube, so it’s best if you can pack them in your saddle bag. Bonus, if they stay in your bag, you’ll always know where they are when you need them. It’s better to only use tire levers for tire removal. If you try to use levers when installing the tire, you could pinch the tube and cause a flat.  Patches  If you use tubes in your tires, a patch kit can be useful. The easiest patches to use are self-adhesive. They’re also easy to carry in your saddlebag that way.  Many cyclists skip the patches, though, and just carry spare tubes instead. Sealant and Plug Kit  If you don’t have tubes and are running tubeless tires, you’ll want to have sealant and potentially a plug kit. Tubeless tires are great because they can reseal themselves if they get a small puncture. However, if the puncture is too large for the sealant, you’ll need a plug kit to fill the hole. Plug kits are small enough to carry in your saddlebag, too.  Tools to Work on Your Bike You may need to make some minor adjustments or repairs to your bike. Here are a few tools you might want to keep on hand for those quick fixes that will help your ride go more smoothly.  Chain Wear Indicator Tool  Over time, your chain will stretch and wear out. Riding a bike with a stretched or worn chain will eventually damage your cassette and chain ring, which can be an expensive repair. So even if you don’t know how to replace your chain, use a chain wear indicator tool to check it regularly. Once your chain begins to show signs of wear, you can take your bike to the shop for a new one or learn how to change it yourself.  Changing your chain when needed will help prevent more costly repairs.  Allen Wrench Set  Bikes use Allen wrenches, and you will want a full set.  You might be surprised at the number of different sized Allen wrenches that a single bike could call for. You may want to make some adjustments to your bike when you’re out on the road or even just sitting at home. For example, if you’re out on a ride and your seat slips, you’ll need an Allen wrench to tighten it back up. Or if you need to adjust the position of your handlebars, an Allen wrench can help with that, as well. It’s critical to check your headset periodically because a loose headset can make it difficult to steer safely. With an Allen Wrench set, you can easily tighten up your headset and any other loose fittings on your bike. Torx Wrench Set Some bike parts will require a star-shaped wrench rather than an Allen wrench. For these fittings, you’ll need a Torx wrench set. The most important is the T25. You’ll likely need the T25 if you change your brakes or your chainring bolts.  Pedal Wrench  At first, I found pedal wrenches to be highly intimidating. But then I purchased a set of Garmin Rally Power Meter Pedals. I had to learn to move the pedals back and forth between my track bike and my road bike. The pedal wrench makes it easy to remove pedals and put them on another bike.  Keep in mind that some pedals don’t use a pedal wrench, but instead call for a large allen wrench (all the more reason to have a full Allen wrench set).  We use this basic pedal wrench in our shop. Torque Wrench  A torque wrench measures how much pressure, or torque, you are using when you adjust the fittings on your bike. For example, when … Read more

Best Top Tube Bag

When we started preparing for our first 100-mile ride, we knew we were going to need to bring along plenty of food to fuel our ride. Our jersey pockets just weren’t going to cut it – we needed a top tube bag with easy access so we could eat on the bike. Top tube bags are ideal for long rides because they give you extra carrying space on your bike but are more aerodynamic than a handlebar bag. Tucked right up behind your stem, it will save space and be easy to access. In this article, we’ll discuss the best three top tube bags for long rides. But before we do that, let’s talk about what to look for in a top tube bag. What to Look for in a Top Tube Bag Space The first thing to look for in a top tube bag is how much space it has and how much food or items it can hold.  So, first think about what goes in your bike bag. For example, if you only plan on packing gels in your top tube bag, you might want the smallest one. On the other hand, if you’re going to pack your cell phone, your charger, as well as your snacks in there, you’ll need a larger one. Most top tube bags hold anywhere from half to 1 liter of items. Compartments You might want one large open bag, or you might prefer a bag with separate compartments to keep all of your goodies organized. For example, you can keep your gels on one side and your bars on the other. Other bags have outside pockets for quick access. Frame Fit For your top tube bag to be aerodynamic, it needs to fit your frame correctly. It should fit snugly up to the stem of your bike. If your top tube bag hangs over the side of the frame, it won’t be as aerodynamic as if it just hides behind the stem. If your bag has straps, they need to be long enough to wrap all the way around your top tube and stem. This isn’t usually a problem with steel frames, but carbon aero-bikes tend to have larger top tubes that might be difficult to fit, and some triathlon bikes have funky geometry with tight angles. You also want to ensure your top tube bag doesn’t interfere with your riding. It should be big enough to hold everything you need without banging into your knees. Mounts and Straps If your top tube has mounts built-in, you can use a frame bag that also has mounts. These work the same way that you would attach a water bottle cage to your frame. Not every bike has mounts, so if yours doesn’t, you’ll want to choose a top tube bag that has straps. Durability Your bag needs to last. Look for a bag with sturdy material and a strong zipper. Most bags are made from nylon, and some will be padded for extra protection.  This is especially important if you are going across rough terrain, such as in one of the popular gravel bike races that is really catching on around the country. Waterproofing Some top tube bags are waterproof or at least water-resistant. This is important if you want to keep your snacks or phone dry if you get caught out in the rain. If waterproofing is important to you, make sure the zipper is also waterproof, or your bag will leak. Charging Ports Some top tube bags have built-in spots for charging ports. This is a reinforced hole in the bag so you can thread wires through. You can keep your battery pack in the top tube bag and charge your bike computer or phone while riding. Top Three Top Tube Bags Rockbros Top Tube Bag Rockbros is known for producing quality bike products at reasonable prices. This top tube bag is easy to open and attaches snugly to your bike frame with Velcro straps. There’s plenty of room for your most needed items, including your cell phone, snacks, tools, and even your mini pump. It’s designed to be aerodynamic and thin enough that it won’t hit your knees while you are riding. It features: Main compartment with two netted inside pockets One tie rope on the outside Attaches with three straps Lightweight and aero Made with weather-resistant and durable fabric Slim design won’t interfere with riding Weight: 98g Size: 22*10*5.5cm Capacity: About 1L Personally, I love this top tube bag because I can fill it with snacks. Also, they’re easy to get out and munch without scraping against my knees while I ride. This bag is great for anyone who needs a larger bag for long rides that doesn’t get in the way, or whose frame design isn’t as conducive to a bag that hangs under the frame. Pros: A large-capacity bag Very easy access while on the move Cons: Too big?  Maybe overkill for shorter rides Find here on Amazon Topeak Fuel Tank The Topeak fuel tank is available in both medium and large sizes, so you can get the one that fits your needs. It attaches to your bike frame with hook and loop straps. If you’re looking for a bag designed to help you charge your devices, this one is a great idea. The bag itself is padded to help protect your phone or battery pack. In addition, it features a cable port so you can charge while riding. Made of 420 denier nylon /PVC Includes charging port Padded for extra protection Two mesh pockets Three adjustable straps 17.5 x 11 x 6.35 cm / 6.9” x 4.3” x 2.5” (Medium) 24 x 11 x 6.35 cm / 9.4” x 4.3” x 2.5” (Large) 120 g / 4.22 oz (Medium) 150 g / 5.28 oz (Large) 0.5 L / 30 ci (Medium) 0.75 L / 45 ci (Large) This bag is a great choice if you want the ability to charge your devices while you’re riding. … Read more

Best Wall Mounted Bike Storage System

It’s likely your families, like ours, have a bicycle a piece, if not more. And while they love the option to choose what bike to ride, it poses one colossal problem: there’s no room in your (or our) garage for anything other than all of their bicycles!  That’s where a good wall-mounted bike storage system comes in. A hook on the wall is a cheap option, but for kids, this can make it difficult for them to get their bike down.  Hanging stuff from a ceiling is OK if you never need to get at it, but if you own a bike you want to use it! A bike wall mount system is a solution to both problems. In this article, we’ll talk about bike wall mounts, go over the top three mounts, and help you decide which is the is best for you. We’ll also give you some guidelines about what to look for and who needs one. Let’s get started. Who Needs a Bike Wall Mount? You might want a bike wall mount if you have a bike and no room to store it. For example, if you’re a busy family and have a lot of bicycles (or own plenty by yourself for different disciplines), you might want to hang them up with wall mounts, so they’re out of the way when they aren’t in use. They can also ensure your bikes aren’t getting knocked over. What to look for in a good bike wall mount Ease of use If the wall mount is too difficult to get your bike in and out, you probably won’t use it. Make sure you find a hanging system that is easy to use, especially if you take your bike on and off frequently. Ease of Installation Is this a mount that you can easily install yourself, or will you need to hire someone to do it for you? Space-saving design Does the hanger save you space by getting your bikes off the floor and out of the way? Cost What’s your budget?  There is quite a range of options, price-wise. As you spend more, you will typically get a more convenient design, and racks capable of holding more bikes. The number of bikes you can store Will the bike mount store all of the bikes that you need it to? Can you hang multiple bikes in a small space or just one? Size of bikes you can store You’ll want to make sure that the rack you use can actually accommodate your bike.  For a basic road bike, this is probably not an issue.  But for a fat bike with large tires, or a triathlon bike with aerobars, be sure the rack can accommodate.  Ironically, kids bikes are sometimes the ones that don’t fit, because of their small angles and frames. Damage-free design You’ll want to make sure that the bike mount won’t damage your bike. Is it sturdy enough to hold your bike? Will the bike swing and bang into another bike? Will the hanger scratch your frame? Materials Is the bike mount made of materials sturdy enough to hold your bike? Will they protect the bike from damage?  This is especially important if you are considering storing a heavy bike like and eBike, which can sometimes weight more than 50 pounds. Best Models of Wall-Mounted Storage Systems for Bikes Feedback Velo The Feedback Velo wall mount works great in homes, garages, and even apartments. It features soft rubber contact points that won’t damage your bike frame and will fit just about any road, CX, e-bike, or mountain bike. In addition, its soft design will safely hold almost any frame shape. Anodized aluminum is durable Will hold up to 70lbs The cradles can adjust independently of each other by 7inches Cradles are 12 inches away from the wall Includes hardware for mounting Mounts to standard wall studs (and easy to mount) The Feedback Velo is a great choice if you want to hang your bike from a stud in your home or garage. Each mount will hold one 70lb bike – meaning it can accommodate most Ebikes, too. In addition, the versatile cradles can accommodate a wide variety of bike types and frame sizes. Pros: Strong. Holds 70 lbs per mount Good distance from the wall, to give your pedals and bars space Extremely secure when mounted into a stud Cons: Honestly, hard to find any Park Tool PRS-4W2 The Park Tool PRS-4W2 doubles as both a wall mount for your bike and a work stand.  It is actually probably made as a work stand first, but is very capable of keeping your bike out-of-the way in your garage or shop. It uses an adjustable clamp that can accommodate tubes from 7/8 of an inch to 3 inches. It adjusts quickly and easily. Accommodates a wide range of bike tube sizes Adjustable clamping pressure to prevent damage to tubes Can clamp to short seat posts 100-pound weight limit The clamp extends 13 inches from the wall, keeping your bike safely tucked up against the wall as close as possible. Attach the mount to a stud (mounting bolts not included) so you can easily reach your bike if you want to work on it. We love this bike wall mount for anyone who enjoys doing their own bike maintenance. Pros: Ideal if you want your wall mount to also be where you work on your bike Secure grip Cons: Probably intended more for work than for storage Pro Bike Tool You’ll want to consider the Pro Bike Tool if you have multiple bikes to store in a small space. This rack holds up to 6 bikes. Each bike can weigh up to 66 pounds each. So while it won’t work for heavy e-bikes, it will work for your typical road or mountain bike. The Pro Bike Tool stores your bikes in a vertical position on aluminum rails. It will hold all types of bikes, including road, CX, touring, hybrid, kids, … Read more