Amanda Whittington is an accomplished adventure cyclist, having done some of America’s iconic bike races, century rides, gravel grinders, cross-country races, and is currently training for track racing. A ride leader and organizer, Amanda is passionate about cycling and teaching others, and works with beginner riders, teaching them group riding and bike safety as well as basic bike know-how.
Creating a route in Strava brings a bunch of benefits to your cycling: it gives me a rough estimate how far you’re going, how long it will take, and how it will meet your workout goals. You can even save your routes with your cycling friends!
Start your Route

Remember that you’ll need a paid Strava subscription to use the route builder. Open up Strava on your laptop or computer — the browser version can be a bit more user friendly than the app for some. Hover the arrow over the Explore tab and click on Create a Route. Strava may ask if it can use your current location. If you say yes, it will zoom in on your location so you can choose your starting point.
For cycling, we find Strava to be the best cycling route builder of the options, although there is a loyal cycling following for an app called RideWithGPS too.
Set Your Map and Route Preferences
On the left-hand side, you’ll see your map and routing preferences. For example, you can select your sport, the fastest or most popular route, your elevation, and your surface preference.
Below that, you can also select if you want Strava to show you:
- Points of interest (for example, local cafes or places to refuel)
- Your personal heatmap (the roads you ride on)
- Global heat map (the roads other people ride on)
- Segments
- Distance markers
- Miles or kilometers
- Map type
If you select Global heatmap and points of interest, you can see where most cyclists travel, identify the best routes, and pick places to break. Strava will also give you some popular starting points.
Add Your Start Point

If you know your starting address, you can type it into the search bar and then click on it to show Strava that’s where you want to start.
If you don’t know your starting point, you can look for Strava’s suggested start points or look around the map until you find one.
Then you can add your other rest points. You can type in the address or search for a location. Strava will zoom in on the spot on the map and ask if you want to add it to the route. Then it will automatically fill in the roads from the most recent point using the most popular roads ridden by other cyclists.
Select Your Endpoint
Next, add your endpoint. If it’s the same as your start location, Strava will automatically fill in the roads. You might see that Strava has created an out-and-back route. If you want to change that, just hit the undo button. Then click on the road somewhere in between your start and end that you would like to follow on the return. You can let Strava fill in the rest, or you can add each road step by step by clicking on one road at a time.
If you see a road you want to avoid, you can use your mouse to grab the road and pull it to a different one. Strava will automatically adjust the route.
Check the Stats

If you like the route, then look at the bottom of the screen. Make sure you are happy with the distance, elevation, approximate time, and surface type. If you are, then you are ready to save your route.
Save your Route
In the upper right-hand corner of the screen, click on the button that says save. A window will open up where you can name your route (required), give it a description (perhaps this Is your best friend’s birthday ride or an ice cream ride), and select whether you want to make it public or private. Of course, you’ll need to make the route public if you’re going to share it. Once you hit save, a new screen will open. This gives you a summary of your new route. You can now export it to your cycling computer, edit it, or even send it to a friend.
For detailed instructions on how to send the route to your bike computer, look up the manufacturer’s directions. Every brand is a little different.
Tips for Creating Better Strava Routes
Use a Computer!
The “Create a Route” tool on Strava is WAY easier to use on a computer than on a phone or tablet. Given the the intricacies of zooming and out while trying to gradually build a precise route, using your finger on a screen can be maddening.
Strava will admit that their route builder tool is really meant to be used on a computer. The user interface is much better that way.

Undo/Redo
If you entered a wrong road by mistake, you can use the undo/redo buttons in the upper right-hand corner to undo it.
Reverse Route
If you want to create a separate route for your return home, you can click on the parallel arrows in the upper right-hand corner of the route builder to easily reverse the route. Look it over carefully in case you need to make any adjustments.
Reverse route can work great on those out-and-back routes, and ensures you only have to do the real thinking in one direction. Routing the “back” part is a piece of cake.
Manual Mode
If your local roads aren’t up to date in Strava’s records, it might not recognize a stretch of road you want to use. If this is the case, you can switch to manual mode. However, Strava can’t guarantee that these are actual roads or trails, and the elevation is only an estimate.

Always double-check your route. Occasionally, Strava may send you on major highways or roads that aren’t really safe if there isn’t a good option on your route. So you’ll want to look over your map and make any necessary adjustments before you finalize it.
What I do is switch to manual mode for just the little bit that I need to go “off-script” in Strava, and then when the route is back on major roads I go off manual mode.
Use Heatmaps
Strava heatmaps show you where other cyclists ride the most often. You can use these heat maps to create better routes, especially if you are riding in an unfamiliar area.
Set Privacy Zones
Using your home as your starting point is OK, but it is probably best if everyone on Strava doesn’t know where you live and ride from day after day. Go to the privacy settings in your account and set up a privacy zone around your house and any other sensitive areas.
How to Upload a Route to Strava

If a friend sends you a route as a GPX file, you can upload and view it in Strava.
Open Strava and go to the Create route, as mentioned above. Then, in the upper right-hand corner, click on the icon of an arrow inside of a circle. It will open up a window for you to choose the file to upload.
Select your route, hit the upload button, and you’ll be able to view and save your route as if you had created it yourself.
How to Turn a Ride You Did into a Route
This is one of my favorite features of Strava.
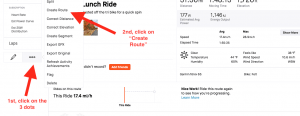
If you look back over your activities and see a ride that you really enjoyed, you can turn it into a route. Likewise, if you see a friend’s ride that you think you’ll like, you can also turn that into a route, too.
Hover over the map of the ride until you see a small button that says, “try this route.” Click on the button, and the route will open up in Strava’s Route Builder. You can make any adjustments to the route you like.
When you’re all done editing the route, click on the Save button. Give the route a name and hit save. Strava will take you to a summary of your route so you can preview it or share it, just as if you had created the route from scratch.
If you need additional help creating routes, you can click on the question mark in the upper right hand corner of your screen for a tutorial that will walk you through all of the steps.