Von Collins is an accomplished triathlete and endurance cyclist, and the author of four fitness and training books: Smarter Running, Your First Triathlon Guide, Fit Foods, and 30 Rut-Busting Workouts. He has been cited as a triathlon, cycling, and fitness expert by Healthline, CNET, Forbes, Eat This, Not That and other major outlets.
The Garmin Rally power meter pedal is a cycling gadget that any gear junkie is going to be intrigued by. We were too, so we gave the pedals a 2-month test. Over many miles and many types of rides, here is what we thought:
Overview and How We Tested
We decided to give Garmin’s Rally power meter pedals a really good test. Snagging a pair of these nice pedals, we used them on two different bikes (one triathlon and one gravel) for a couple months, logging several hundred miles on the Rally pedals.
Our road test included a number of conditions – nice dry pavement, rougher gravel roads, steep mountain climbs, and even some single track riding. We used the SPD-SL model, which was great the road but if we were doing mainly gravel and off-road we may lean toward the two-sided SPD option. The Rally also comes in the Look Keo model. Your decision on which to use is really a broader decision, and for that we would direct you to our bike pedal and cleat guide.
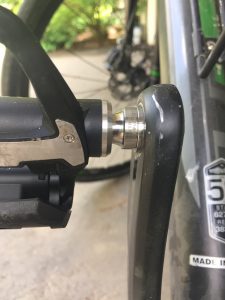
We found that the pedals work well for use on multiple bikes as long as you have a pedal wrench handy. It can be nice to switch them from bike to bike, since they are at a price point high enough that you may not want to own multiple sets of the pedals.
First Impression of the Garmin Rally Pedal
Once we installed the pedals – which included working hard to get the old pedals off one of the bikes as they had not been touched for a long time – we gave them our first spin. We loved the feel and the surface area on the SPD-SL platform. They provide a nice, large surface for maximum power transfer.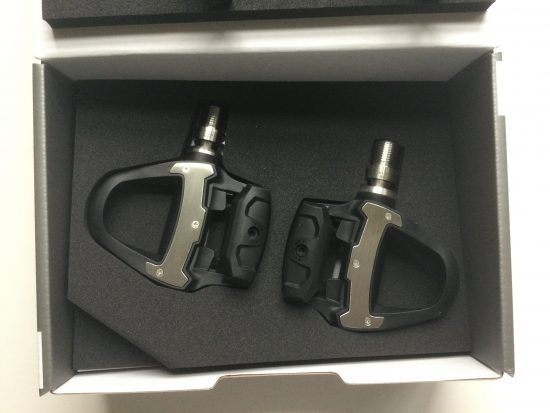
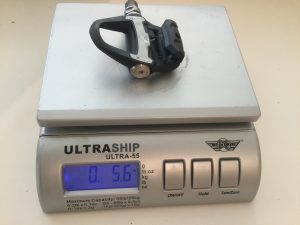
The pedals are light – which is pretty amazing given the amount of technology that is built-in to them. More on the weight below, but we did not exact to actually shave a few ounces off when compared to the less-advanced pedals we had been using.
To be exact, the SPD-SL pedals weigh-in at a featherweight 160 grams. When you consider that some regular SPD-SL pedals weigh over 300 grams, it is pretty amazing that you not only get a power meter, but also a really nice pedal in this package.
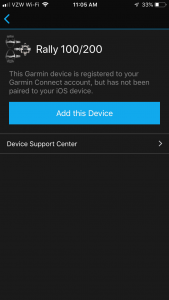
It took a little work to get the pedals to calibrate with our devices, but after some trial-and-error we realized it was a compatibility issue, which is important to know about. (More on that next.) When we finally used the pedals with a Garmin Fenix 6, they connected quickly.
It is really important to make sure that your crank length setting is done correctly in your Garmin Connect app, which then talks to the pedals. You should only have to do this once, but one of our testers found that skipping over this step resulted in incorrect readings from the pedals.
You will want to calibrate the pedals, both at first but also relatively frequently as you ride. Switching bikes and hitting the pedals on hard objects can knock the calibration off to a point where the readout is no longer valid. A 1-minute calibration (which you do with your phone, watch, or any device with Garmin Connect) is all it takes to get calibration back on track.
Real-time cycling stats and numbers are available as you ride, both on your watch but also a bike computer. It is definitely safer to have the numbers appearing on a computer. The watch face can be a bit small, and we would not want you scrolling through the screens while rolling. There is a LOT of potential data to intake, and a computer is a better setup. However, for looking at your stats post-ride, anything works as long as it is a compatible device….. You just need to be sure the device can read the watch’s output during the ride. We made the mistake at first of thinking Garmin Connect on our iPad could process all the info post-ride, but it can only do that if the pedals were ridden with a compatible device.
One thing we loved about the Rally pedals is that they are dual-sided, meaning you don’t just get data from one pedal, but rather from both sides. This is actually really important, because one of the major benefits of using power meter pedals (versus other types of power meters) is that you will understand the symmetry of your pedal stroke. We had many rides where we were cranking way harder on one side than the other, and one of our testers learned that his early-ride stroke power was skewed very heavily to the right leg. Once he got warmed-up, it balanced out. He had no idea prior.
The data that you process after a ride can be a bit overload, but it is pretty incredible. This is best done on the Garmin Connect app where you can comfortably scroll-through your post-ride stats. Don’t try to understand everything at once. Choose a few things you want to focus on, compare rides, and then expand the things you are watching.
Of course, the major thing we look at it the power, and it sure is fun to see how much power you can get on a tough climb or a long, flat straightaway.
Compatibility
Device compatibility is a little tricky on the Garmin Rally pedals. Basically, to be able to process the data coming off the pedals during your ride, you will need to ride with a compatible Garmin bike computer or compatible Garmin wearable. Older devices may not be compatible with the pedals, and they won’t transmit in-ride data directly to your phone (although the phone or Ipad is a preferred way to process the data after a ride). This slight bit of clunkiness is something that is only really an issue at first. Once you have your devices all setup, the data flows smoothly and like butter.
Garmin publishes a list of compatible devices for the Rally pedals, but in short, the pedals are compatible with the newer Edge bike computers, and most of the newer watches from Garmin including the Fenix, Forerunner, Marq, Quatix, and Tactix. The key is to have a relatively new device (roughly ~2 years old and newer). Older models might not able compatible with newer pedals.
Calibration
Calibration of the pedals is very important, and should be done a little more often than you might think. We are not honestly sure what happens inside that pedal or in the app when you calibrate, but it only takes a few seconds and can make a big difference. It is super simple and is done by hitting a button on the screen of the Garmin Connect app.
Having a mis-calibrated pedal results in data that is off. The miscalibration can be caused by a few things – hitting an object with the pedal, switching bikes, or gradual deviation from baseline over time.
The first experience we had with calibration issues was when we noticed our power running many watts higher than normal. The solution was to jump on the smart trainer (in our case, a Tacx Neo II) and compare the power output on the smart trainer with that of the pedal. The pedal power was a consistent 40 watts higher as we rode, and after a very brief and simple calibration, it got back in line to within 2-3 watts difference, which is about where you want it.
Then, during an intense gravel, pavement, trail, singletrack bike ride, one of the pedals smacked a rock quite hard. After the ride, it was clear that the power shifted exactly when that rock contact was made. The graph of power from the multi-hour ride showed a major wattage drop-off at the exact moment. Again, a quick calibration got everything back in line.
Garmin Rally Pedal Downsides — Are there any cons?
You can probably tell that we are fans of the Garmin Rally meter pedals, especially as data junkies for our workouts. However, we want to give you a balanced view of our tests.
An obvious downside of the Rally pedals is the cost. When you are shelling-out this much cash, you definitely think twice. The pedal cost is on par with the price of buying another (cheap) bike! For some, it is an obvious no-brainer to use pedals like these, because it is the next step in analytics and precision of training. For others, the cost is an immediate non-starter.
While the battery life was good, there comes a point when the battery conks out and the pedal data is just gone. It might occur in the middle of a ride. However, this is the case with most power meters – your best bet is to replace batteries pre-emptively.
As we learned the hard way, you will need the right equipment (from Garmin, of course) in order to be compatible with the Rally pedals. If your watch or bike computer is too old, it will not be able to pick up the readout from the pedals, and you will need to upgrade your device. This can be annoying for those who are using a bike computer or triathlon watch that they really like and had no intention of upgrading.
Single Sided or Dual Sided?
Dual.
You definitely want the dual-sided pedals. Yeah, they cost a bit more, but as we used the pedals one of the main benefits was understanding the differences between our left and right pedal strokes. They had different power cycles, different overall output, and even different balance and centering of our feet on the pedal platforms themselves. With a single-sided pedal, you are not going to get this comparative data, which we think is one of the main reasons to go with pedal-based power meters.
Do you Need Power Meter Pedals?
Having dual power meter pedals is pretty cool and provides tons of data that you honestly never knew existed before. With that said, nobody needs a power meter, including pedal-based power meters. But if you have the budget and are trying to make your training more precise, they can be a nice splurge. Plus, they are just really good, effective pedals – even when putting the power technology aside.
If your intent is to measure power mainly indoors, you won’t need a power meter – you should be able to get what you need on your smart trainer app.
One thing you will find is that the data you get at first will actually be overload, but over time you will zero-in on things that are important to you. If you only have $1,000 to spend on your bike and you have not done some basic modifications like upping your wheel and hub game, we might suggest doing that first. However, for some, the Rally pedals will be money-well-spent as they dial-in their power output and their training.
Alternatives to the Garmin Rally
We cover all of the different types of power meters in our devoted piece on the topic (see our power meter guide), if you are at the 101 level of your learning.
If you want the short answer, we think Garmin is the leader when it comes to the pedal-based power meters, and the Rally is the top choice of their lineup. The other option is the Garmin Vector, which is older, only comes in a Keo cleat style, and always runs the list of being less compatible with newer products. When it comes to Garmin, we always suggest spending a couple more bucks on the newest models to be sure you can use it for a long time.
The other option we know of for pedal-based power meters is the Favera Assiomo, which only measures the power on one side (the Garmin Rally measures both sides). We have not personally used it, so can not provide a review on the pedal itself or the interface with the data.
If you don’t need a pedal-based power meter, the crank-based options have some merit, such as the product from Stages. However, we would have to stretch to convert from pedal-based to crank-based. We think the simplicity of pedal-based is the clear way to go.
Conclusion
We are big fans of the Garmin Rally power meter pedals. If you are going to get a power meter, it is a no-brainer to make it pedal-based. And if you are going to get pedal-based, it is a no-brainer to get dual-sided versus single. These are the obvious ones to get.