
Von Collins is an accomplished triathlete and endurance cyclist, and the author of four fitness and training books: Smarter Running, Your First Triathlon Guide, Fit Foods, and 30 Rut-Busting Workouts. He has been cited as a triathlon, cycling, and fitness expert by Healthline, CNET, Forbes, Eat This, Not That and other major outlets.
Cycling Cleats and Pedals: SPD vs Look vs Speedplay vs SPD-SL
If you’re new to cycling or triathlon, this is one of those decisions that feels way more complicated than it should be.
SPD, SPD-SL, Look, Speedplay . It is easy to go down a rabbit hole comparing every option, trying to figure out what’s “best.” Most people end up more confused than when they started.
The truth is, most people prioritize speed or weight, when they should prioritize utility and comfort.
What actually matters is how you ride:
- Are you stopping often or mostly staying on the bike?
- Do you care more about comfort and ease, or performance and stability?
- Are you just getting started, or already comfortable clipping in and out?
- When you get off the bike, are you on pavement? Indoors? On grass or mud?
I’ve used different pedal systems over time, and the right choice is usually much simpler than it looks on paper.
In this guide, I’ll break down:
- What each system is (briefly)
- The real-world pros and cons
- And most importantly, which one I’d choose depending on how you ride
If you just want the short answer, I’ll give you that first, then you can dive deeper if you want.
| Cleat Type | Best For | Downside | Cleat | Pedal | Shoe | |
|---|---|---|---|---|---|---|
| SPD | 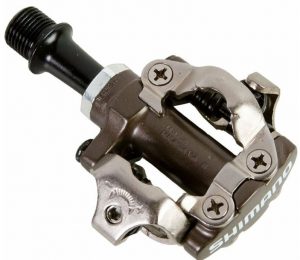 | General-purpose cyclists, gravel, mountain, and indoor cyclists. | Not max power - power is transferred in a small contact point. | Shimano SH51 | Shimano EH500 | Shimano RX600 |
| Look | 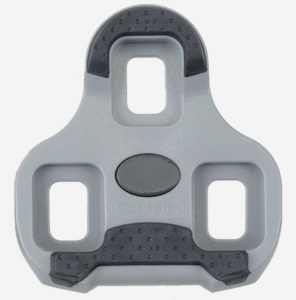 | Higher-end road cyclists who want max performance. | Not great for mountain bikes. | Keo Grip | Look Keo 2 Max | Sidi Alba |
| Speedplay |  | High-end road cyclists. | Uncommon. Not compatible with indoor cycling. | Speedplay Basic | Wahoo Speedplay Zero | Giro Cadet |
| SPD-SL | 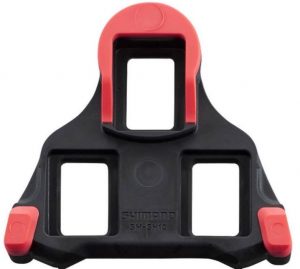 | Cyclists looking for broader platform. Gaining popularity. | Compatible shoes tend to be hard to walk in. | SH11 | Sidi Alba | Shimano Ultegra 8 |
Cut to the Chase:
If I Were New to Cycling, Here is What I Would Do
If I were starting over today, I wouldn’t overthink this decision.
- I’d choose SPD pedals and cleats. They work great for 90% of the people out there, and they allow you to walk around normally when you step off the bike. They are by far best on gravel bikes, too.
- If I was a serious road biker, I’d maybe consider SPD-SL or Look, but only if I was seriously focused on longer endurance rides or trying to squeeze out that extra 1/10th of 1mph on my hardest rides.
- I would not start with Speedplay or any eggbeater style of cleat unless I was already used to them from prior experience. They are becoming relics in my opinion.
Most beginners get stuck comparing every option and trying to pick the “best” system. In reality, the best choice is the one that matches how you’ll actually ride.
If you’re unsure, SPD is by far the safest place to start. It’s forgiving, practical, and far less likely to frustrate you early on. It’s also pretty universal and the most common cleat setup.
Most Common Types of of Cycling Cleats
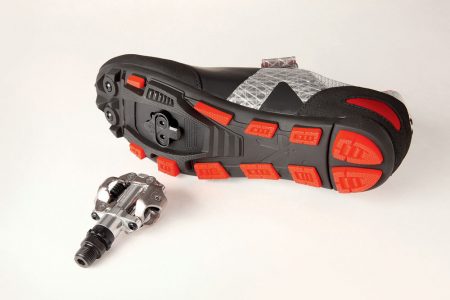
SPD Bike Cleats (This is what I would buy)
The SPD pedal is perhaps as close to a universal standard as there is in cycling, knowing that there will probably never be a true standard. The SPD is the most common kind of pedal and cleat you will find, perhaps with the exception of plain old generic kids pedals.
These are the type I use on all my bikes these days. They are easy, simple, and common.
The kicker for road cyclists is that the SPD cleat was really developed for, and is probably most universally known as, a trail and mountain bike pedal. Still, SPDs work great on road and triathlon bikes, and there is nothing wrong with using them if that is what you are most comfortable with. We have known many road and tri cyclists who prefer to ride on SPDs, just for the ease of use, because they prefer the shoes, or because they just want to have one cleat system across all of their different bikes.
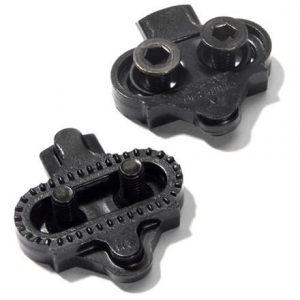
SPDs are known as a “two-bolt” cleat because they attach to the shoe with two bolts. This gives the rider a feel of a more fixed attachment point on the ball of the foot, with the power transfer perhaps ever-so-slightly reduced when compared to a three-bolt system.
What are the advantages of an SPD? Many. First, the shoes they are compatible with are quite comfortable, and generally easier to walk in. This is a benefit if you like to get off the bike and walk around a town, a coffee shop, or any other site during your rides. Second, we find these cleats to be the easiest to clip in to when you are stopped, at a stoplight or just starting out. That means less messing around when you are near heavy traffic.
Finally, this is the type of pedal / cleat combo you will often find on the bikes at spin classes or bike rentals as well, making it a good go-to cleat if you can only choose one. If you happen to rent a bike on the warm-weather vacation, or want to take the occasional spin class at your health club, the odds are best that the bikes will be outfitted with SPDs. They are the closest thing to a universal cleat that there is (remembering that there is no such thing as a true universal cleat).
Best For: People who want a highly universal cleat that will fit on many pedal designs, gravel bikes and mountain bikes, spin class bikes, and other cycles. Also great for people who want highly-walkable bike shoes to go along with their cleat.
Not For: High-end road cyclists, because many of the top-market road cycling shoes are not compatible with SPDs
SPD Shoe I Like: Shimano RX600 (find here). Made for gravel bikes, but a superior all-around shoe in my opinion..
SPD Pedal I Like: SPD EH500, Dual Platform (find here)
Look Bike Cleats
Look pedals are common with the road biking community, but not so much in mountain biking and you will rarely find them on spin class bikes. Look pedals are a classic 3-bolt pedal, with the cleat connecting to the shoe using three points of contact for a more. This gives them a broad power based, and they have a wider contact platform. The cleats are compatible with most of the top road biking shoes on the market today.
A native of the ski industry, Look took many of the concepts they were working with in the ski binding world and applied them to bike pedals. Through some trial and error in the 70s and 80s, they perfected the design and became one of the more popular cleat/pedal combos on the market. Look pedals give the rider a bit of “float”, meaning you have some side-to-side movement in your foot even when fully clipped-in. This is easier on the knees, as it allows the leg to follow its natural range-of-motion with each pedal stroke. They have a bit more of a plasticky feel, and a triangular shape that embodies the three-bolt design.
The two main lines from Look are the Delta and the Keo. They look similar but are not identical. The Delta tends to be popular with indoor spin class bikes, and is actually compatible with Peloton. Keo is intended more for outdoor road bike use.
We like the efficiency of the power transfer in Look pedals and cleats. You feel like you are getting a nice, stiff, direct transfer of your effort to the chainring with every stroke. We also like that the shoes compatible with Looks are stiff and high-end, perfect for serious road riders and triathletes.
What is not to like about the Look system? Probably the most obvious thing is that shoes equipped with Look cleats can be hard and a bit slippery to walk in. Do not plan on having a normal gait and stride if walking around your destination in your Look shoes. And they are a little less universal than other options when it comes to things like spin classes and renting bikes on the road. If you are on vacation and plan to rent a road bike for a long tour, you may need to bring your own pedals in addition to shoes.
Look cleats look and perform almost identically to the SPD-SL cleats (not to be confused with SPD cleats). They are basically twins. We write more about the SPD-SLs below, but if you are looking at them side-by-side, they will appear to be one in the same. Unfortunately, the two systems are not entirely compatible with each other, so take take to get the right system for you. Many people have been able to clip their SPD-SL cleat into a Look pedal in a pinch, but it is not a good long-term answer because the systems are just a little different.
The cleats are plastic, and they will wear down over time, so you will need to replace the cleat on the shoe once or twice each season.
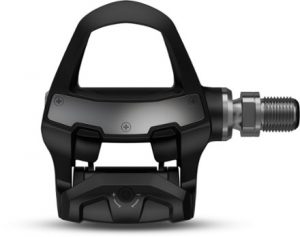
Quick note: There is a version of a Look pedal that actually has a built-in power meter. It isn’t cheap, but can be an easy way to measure power if you are considering doing so.
Best For: Higher-End Road Cyclists who want high-performance but don’t mind a shoe that is difficult to walk in
Not For: Mountain bikers, or people who will mainly cycle in spin classes
Look Shoe we Like: Sidi Alba (find here)
Look Pedal we Like: Look Keo 2 Max (find here)
Speedplay
Speedplay pedals and cleats are a notch or two down in terms of popularity, but they tend to group of dedicated road cyclists who are very loyal to them.
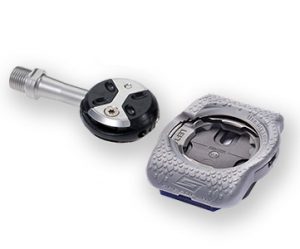
Looking at a Speedplay pedal, it looks a little funky when you first see it. The clip is circular. The platform can be quite large, or next-to-nothing, depending on which pedal you choose.
Quickly, though, you see that the functionality is quite good. Speedplays usually have dual-sided surfaces, which is great when you need to get clipped-in in a hurry (like at a busy stoplight). They have very good adjustability for things like clip pressure and float. And they tend to be lightweight compared to the other options out there.
So what are the downsides? The most obvious one is price. Speedplay sits at a price point that is usually a notch above the other options. Compatibility is the other… you usually do not see many bikes that just happen to have a Speedplay pedal…. Or shoes that happen to have a Speedplay cleat. They are typically something that someone who is part of the Speedplay cult has.
Speedplay pedals use a four-bolt system, unlike the two-or-three-bolt systems that are more common in pedals. We like, though, that they built most of their cleats to adapt easily to the three-bolt shoe, something the allows users to still have excellent shoe selection even though the pedal can be a bit random.
It is a great pedal if you are a cycling purist who wants a high-end, light cleat and pedal. It is probably not the best choice if you are looking for something that is highly compatible with your friends’ bikes.
Best For: Avid road cyclist who want a unique, higher-end pedal and cleat system
Not For: Beginners and intermediates who just want a good, all-around system
Speedplay Shoe we Like: Giro Cadet – good all-purpose and versatile shoe (find here)
Speedplay Pedal we Like: Wahoo’s Speedplay Comp Pedals (find here)
SPD-SL
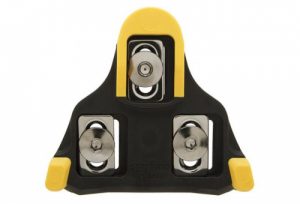
SPD-SLs are nothing like SPD cleats. In fact, we wish Shimano would find a different, distinct name for them because they can be confusing to some. For now, we will just call them the SL cleats, because about the only thing they have in common with true SPDs is the naming.
I rode SPD-SLs when I was heavy in to road biking, before gravel biking became my primary cycling type. I liked them. I felt the power transfer was excellent, I liked how they felt on my knees, and the shoes I could get for this 3-bolt system were incredibly lightweight. When I started gravel riding, though, I found SPDs to be superior.
The SLs really resemble the Look cleat and pedal design in style and feel. Like the Looks, they are a 3-bolt system with a triangular profile. Like the Looks, they have a broad and wide platform so the foot has plenty of surface area on the pedal to transfer power. And like the Looks, they have impressive float from side to side to provide comfort to any cycling stroke. We ride the SLs on some of our road bikes, and love them. They are compatible with many of our favorite shoes, shoes which are stiff and high-performance, and we feel give us max speed.
The plastic cleats tend to wear down over time, especially if you walk on them a lot, so expect the cleat piece to be a supply that you need to replace a couple times a year.
A common question is “are the Look and SPD-SL systems interchangeable?” The answer is not entirely. A three-bolt shoe that first a Look cleat will also fit an SL cleat. But the sizes are just a few millimeters off when it comes to the cleat-pedal fit, so a SL cleat needs to fit to an SL pedal. A Look cleat is needed in order to properly fit to a Look pedal. You can probably use one cleat in the other’s pedal in a pinch, but it would never be your long-term solution.
SPD-SLs tend to be used more on road and triathlon bikes. They can be a bit big and hard to disengage quickly from, which makes them not ideal for mountain biking where you need to be super nimble and low-profile.
Best For: Advance road cyclists who want great power transfer and compatibility with excellent shoes
Not For: Leisure riders who like a versatile shoe/cleat, and value the ability to walk comfortably in their bike shoe
SPD-SL Shoe we Like: Sidi Alba (find here)
SPD-SL Pedal we Like: Shimano Ultegra R8000 (find here)
Beginner Tutorial: Cleat and Pedal Basics
Maybe you are reading this, but still saying “This is great, but I just want to know how to clip onto my bike with those fancy bike shoes.” We will back up a second, and give you the overview.
I was confused by pedal setups when I started biking. You actually need three items that work together as a system. That is why the decision on which system to go with is always the first one you need to make.
3 Things You need:
There are three components that we have been mentioning pretty interchangeably above, but it is worth spending a minute on each one just to be sure we aren’t glossing over the basics for those who are new to cycling (and if you are one, we are glad you are here!)
A Pedal
A road bike usually comes either with no pedals, or with very basic alloy pedals which are intended to be swapped out by the buyer. This is because each rider has a different type of pedal that they prefer, and someone may want to invest $50 in pedals while the next person is ready to spend $250. As you can gather from the info above, the pedal you choose will make a difference in the cleat that you then put on to your shoe, as well as the shoe itself.
Putting a pedal on your bike is a piece of cake. Each bike is made with universal threads that a pedal can screw in to. Just remember, the right pedal loosens by turning counter-clockwise, whereas the left pedal loosens by turning clockwise. This throws some people off.
For installing and removing pedals, there is a thing called a pedal wrench (like this one at Amazon) which makes the job more efficient, but most people with some basic wrench tools at home can fasten and loosen a pedal very easily. Some pedals use an Allen-style wrench instead of a pedal wrench. Keep in mind that when you remove a pedal after lots of use, it can be quite difficult to unscrew. Consider adding some bike lube or WD40 to help it.
You will hear the term “clipless pedals” mentioned often, but most pedals nowadays are clipless. There was a day when you would need to actually fasten your shoe/cleat onto the pedal, but fortunately those days are long gone.
A Cleat
The second thing you need is a cleat. As you can see from our reviews above, the cleat needs to be compatible with the pedal you choose. An SPD cleat can not “clip-in” to a Look pedal, and so on. The cleat that you choose also makes a difference on the shoe that you choose, as the configuration of the holes for screwing the cleat on to the shoe can be different by shoe. Some are made for the two-bolt SPD, others for the 3-bolt SL, and so-on.
Putting the cleat on to the shoe is easy, and can be done at home with an Allen wrench. You can typically adjust the positioning of the cleat to best align with how your pedal stroke moves. Be sure to adjust it throughout the first few rides to be sure the point of contact between your foot and the bike feels right for your knees and legs.
A Shoe
Finally, you will need a shoe. The shoe should be one that feels good on your foot, but is also practical for what you plan to use. If you prefer long road rides with a group of hard-core riders, you might be a good candidate for the stiff and efficient SPD-SL. If you want a shoe that will be compatible with your spin class, it is most common to choose the SPD. If you want a shoe that you will be able to walk around in without slipping or damaging the floor, be sure to choose a “recessed” shoe, but you will have the most options with SPD.
Don’t skimp on the shoe. In addition to being important for your power-to-bike transfer, the shoe will determine your overall comfort on long rides. We’ve been on very long bike rides with the wrong shoe, and the first thing that begins to hurt is the bottom of your foot! A good, stiff shoe with plenty of energy displacement will solve that problem, but not if you are spending less that $100 on your shoes. Better if you are willing to go above $200.
For beginners, we recommend SPDs. They are the most universal and easiest to get used to, and don’t cost an arm and the leg. The compatible pedals often have a larger platform, which is nice at a stoplight.
2 bolt vs. 3 bolt (2 hole vs. 3 hole)
We could have started with this point, as it is a key distinction when it comes to cycling cleats. Bike shoes are typically compatible with either a 2-bolt or 3-bolt cleat, not both.
Bolts and holes are synonymous. 3 bolts simply means that the shoe is setup with three holes in formation to bolt or screw the cleat into the shoe. 2 bolts means there are two aligned holes (but when you look at the shoe, there will be multiple positioning options for the cleat, so you will see a few pairs of holes).
Generally speaking, the SPD are the standard 2-bolt cleat and pedal. Most Speedplay models also fall into this 2-bolt category. The SPD-SL and Look are 3-bolt cleats and pedals. So, if the shoe you buy is a 2-hole cleat design, then you can’t put a Look cleat on it, for example.
What about Peloton Cleats and Pedals?
This is probably a good place to talk about the uber-popular Peloton bike. Peloton comes with a pedal already, so you don’t need to worry about that. The pedal on a Peloton is compatible with any 3-hole or Delta-style cleat, and the company highly recommends that you use their supplied pedal and not swap out with your own. So, if you are serious about riding a peloton, you should invest in an SPD-SL or Look shoe and cleat. You can always use the shoe that comes with Peloton, but many riders prefer to use their own shoe, one that they can ride outdoors with too.
Power Meters in the Pedals
To complicate matters even more, there are options to have a power meter — a device that measures your wattage and other factors when on the road — right in your pedal. I have personally used them, and if you are a data junkie or really trying to dial-in on the finer points of your power and pedal stroke, they can provide some interesting data. For many people, it will actually be too much data and the expense might not be worth it, but for some it will be a gamechanger.
I used these pedals for about two seasons. I enjoyed riding on them. But I did not like having batteries wear out, and I felt that the information was overkill.
Garmin makes the best power meter pedals. They are much more expensive, but the quality is excellent (they are amazingly light and well-designed) and there is a lot of technology packed inside them. You can get the pedals in SPD, Look, or SPD-SL compatible designs. For best prices, find them here directly from Garmin.
Do Bike Cleats Wear Out?
Yes. Bike cleats wear out, but their lifespan really depends on how they are used. Road-style cleats can often start to break if you hit a rock or walk on them too much. SPD cleats tend to be more durable.
The pedals usually last for a long time, and typically they only wear out if you put a ton of mileage on, or if the riding is harder riding like you often see with mountain bikes or gravel bikes.
We often replace our cleats (not the shoe, just the cleat) each season, but expect the pedals to last many seasons.
Where Should you Position the Cleat on the Shoe?
Most people will say that you want the cleat right under the ball of your foot. Lots of good bike fitters, though, will suggest that the cleat should be as far back on the shoe as you can get. This will put the cleat in a spot where your entire foot is giving it the pressure it needs on the pedal, not simply your front of your foot.
Be sure that the position of the cleat allows for your cycle stroke to be natural and straight. A slightly twisted cleat — right or left — can actually cause a knee or ankle issue pretty quickly.
Which Pedal and Cleat is Best for Gravel Bikes?
We are getting more and more questions about gravel biking. SPD pedals are the preferred pedal for gravel biking, because the cleat allows you to be most nimble if you find yourself on a singletrack trail or rough road.
It can be temping to go with more of a road-style pedal and cleat for power on those long gravel straightaways, but you can largely solve this problem by simply getting a stiffer SPD-style shoe.
Practice and Safety
Whichever system you go with, be sure you practice with it enough so you get comfortable before you take it out on a high-traffic road or in a race like a triathlon or time trial. Each system feels a little different. I recall that as I switched from an SPD system to an SPD-SL system, I felt like a rookie all over even though I had been riding for a good decade.
There are a few tricks for getting comfortable with the system. The first is to take your new pedals and cleated shoes out for a spin in a low-traffic area like a parking lot or a side street. Practice getting going, and then coming to a complete stop. Unclip. Then clip back in as if you are at a stoplight that turns green. Do it over and over until it feels second nature.
Another trick that we like is to set your bike up on an indoor bike trainer, if you have one. Get a few good spin workouts in with the new pedals, and make sure you are clipping and unclipping with the same urgency you would have on a road ride. This type of practice as the added benefit of allowing you to break in the new shoes in a controlled environment.
Finally, know that everything is adjustable. If the shoes seem to unclip from the pedal too easily, you can adjust the springs to make it all tighter. If the pedal doesn’t unclip when you stop, you can make it looser. If the positioning of the cleat on your shoe doesn’t seem straight or is just uncomfortable, you can adjust that too. Just have the right set of tools nearby at the outset, and plan on adjusting several times during your first few rides or 100 miles.
What Most People Get Wrong About Cycling Cleats
The biggest mistake I see is people choosing a pedal system based on what serious cyclists use, instead of how they will actually ride.
Road systems like SPD-SL and Look are great when you’re riding consistently and staying on the bike. But if you’re stopping often, walking into stores, or just getting comfortable clipping in and out, they can feel awkward quickly. They work poorly for gravel bikes the second you have to dismount, and they are inferior on mountain bikes, too.
A lot of beginners assume they need the same setup as experienced cyclists right away. In reality, starting with something more practical often leads to a better experience and more time on the bike.
Another common mistake is assuming the differences between systems are bigger than they really are. For most recreational riders and triathletes, any of these systems will work. The bigger factor is comfort, confidence, and how easy it is to use in your day-to-day riding. The fact is, once you are clipped in, most of these pedal and cleat setups will behave in largely the same way, assuming you have fitted everything correctly.
Glossary of Bike Cleat, Shoe, Pedal Terms
Bolts: The number of contact points (screws) that a cleat has with the bike shoe. This is important to know for cleat-to-shoe compatibility. SPD has 2, Look has 3, Speedplay has 4.
Cleat: The critical piece of metal that a) bolts on to you shoe and b) clips in to the pedal, creating a point-of-contact.
Clip-In: The process of attaching your shoe to the bike pedal via a clip. Once you become good at it, it is second-nature.
Clipless: A term you often see in the pedal/shoe market, but nowadays most systems are clipless so it kind of goes without saying.
Compatibility: The ability for a shoe, cleat, and pedal to “fit” each other. They need to be compatible. For example, and SPD cleat fits and SPD-compatible pedal and 2-hold compatible shoe.
Egg Beaters: A type of clip made by Crank Brothers that is popular with some mountain bikers. They get their name because they look like a mixing blade that you would find in the kitchen. They tend to be strong and light, but not popular with road or tri cyclists.
Float: The amount of side-to-side swivel that you can expect from a cleat. Some cleats lock your foot in with zero float. Others offer up to 20 degrees of float. Many riders prefer a float of around 6 degrees, 3 degrees either way. Having some float is believed to be easier on your knees. Too much float causes you to lose power.
Hole: See “Bolt”
Memory Positioner or Tab: Some brands offer a small piece that fits on the shoe, under the cleat, marking where your cleat should go given your personal preference. This type of guide is handy when you are swapping out the cleats, something you will do regularly if you ride a lot. Having an off-positioned cleat could cause knee or ankle discomfort.
Platform: The flat area on the pedal where the forward half of your shoe rests. A wider platform is more comfortable and captures more power.
Recessed: A cleat that recesses into the shoe when walking. In particular, many SPDs have recessed cleats, which are a benefit when you want to talk into a store or simply around your garage without the inconvenience of a protruding cleat.
Retention System Pressure: The adjustable setting of how “tight” your cleat will be locked-in to your pedal. At first, start with lower pressure, allowing your foot to come unclipped more easily.
Stack Height: The distance from the top tube of the bike to the bottom bracket near the chainring. Important, because you don’t want your shoe to impact the stack height very much at all. Thinner is generally better, and ideally your shoe has a minimal impact on this height.
Stiffness: When it comes to bike shoes, it refers to the stiffness of the sole. More stiffness is good, because that means your legs are transferring more power directly to the pedal, instead of losing power as it leaks out from flimsy shoes. You kind of what to feel like your sole is as solid as a 2×4.
Tension: Refers to the level of pressure required to release the shoe and cleat from the pedal. A good system has adjustable tension so you can set it to your preferred level. Most riders want just enough tension so the cleat will not accidentally release while cycling, but not so much that it is difficult to release at a quick stop.


Thanks good writeup. As a beginner Tri i’ll probably go SPD with that bike. And during my daily commutes in frequent stop/go situations, i’ll just keep the rat traps on that bike.
Thanks for the write up. Wish I would have found this before some purchases.
Excellent article! I saved it and have read it a few times and feel I have a very good understanding now. All the info I needed in one place. Thank you 🙏
Thanks, good explanation. I tried using my husbands old SpeedPlay system with disastrous results. Not a good fit for a beginner. I’m sure I’ll be switching.
As to walking around in cleats, they have coverings; I get on my bike to ride, not walk or hang around in coffee shops in sweaty kits. Also, a bike shop mechanic claimed that Speedplay actually had a wider platform than SPDs..interesting thing to check out. So after 37 years of cycling with numerous double centuries, time trials, casual spins, etc. I can tell you that it’s not frame, the saddle, or the pedal-it’s the motor that matter and the frame around that motor. And how one sets up the fit to all of that. All reviewed pedals are fantastic with their tweets that riders will enjoy or cause them to look for something else. Looks are stiff like you note and still have a pair of KEOs put aside. Speedplays offer more. float and less locking into a position tha can cause repetitive motion injuries. Take getting use to, but the learning curve is minimal. SPDs are solid and durable performers that are easy to maintain, simple in their design, and the cleats are reasonably price and have a decent wear life. Now that’s just from someone who has ridden numerous pedals, shoes, bikes, events, and many many miles over the years.
Looking for a pedal and shoe that I am able to transfer the pressure off the point of the foot and more towards the arch/rear. Getting some pain in the metatarsal area. I have read speedway allows this but I’m a newbie at this. Any guidance?
Thanks, this was a very good introduction for me.
I have delta clips for my road bike, but am starting to spin at the local gym which uses the SPDs. Question is: can I just get a new set of two-bolt clips and attach them to my 3-bolt shoes or do I need new shoes too?
To our knowledge, you will want new shoes…. however, we can’t speak for each shoe manufacturer. Might not hurt to order the clips and see if they will be compatible. Worst case is they aren’t and you just get the new shoes anyway (you will need the new clips either way).
You would need a 3 bolt to 2 bolt adapter, like this one: https://www.amazon.com/Wellgo-Rc-8-Cleat-Adapter-Cleats/dp/B00TJB2EAU/ref=dp_prsubs_2?pd_rd_i=B00TJB2EAU&psc=1. This will let you use your current shoe with a SPD cleat.
They sell adapters on Amazon so you can keep your same shoes or they sell shoes that have both three holes and two holes on the sole so you can use whatever cleat you want.
Great article. Just got my first road bike and it came with SPD pedals. I didn’t know how much I didn’t know until I read this, and now I know what I need to stray learning.
Glad it helped!
This was extremely helpful for me as a first time buyer. I ended up going with the recommended SPD shoes and pedals for their versatility.
This is the best article on this subject Well DONE!!
This article was so informative…
I finally decided to upgrade from my cages to clipless and almost order incompatible things…. thankfully I saw this article before purchasing. I’ve saved it for future reference
Very good article.
I’ve been using the old school toe clips and straps and considering switching to a modern system.
This really really helped.
Thank you!
It all depends on the type of riding you do. I rode toe clips for years when commuting to work. But, I did’n’t tighten the straps all the way. I just want the safety of my feet not slipping off the pedals. If you go for scenic easy rides go with a pedal that has spd pedal on one side and flat on the the other. Shimano makes one A 530. They are a little pricey. Look it up just to see if you like the style. You can always pick a different brand with same feature but, cheaper or go to a bike swap show. I just went to one and bought a $50 Bontrager saddle for $10.
I’ve been riding spd for years, but I just picked up some road shoes at a discount/impulse buy. Is there any disadvantage to using an adaptor plate to attach my spd cleats to the road shoe?
Sorry for the delay. A very thin adapter plate is probably OK, as long as the additional build-up on the shoe doesn’t give you knee issues. The main thing is to check the plates several times after your first rides to be sure everything is fixed and secure and the screws are all tight. View it as a solution that will buy you time – eventually you should move to a consistent shoe and cleat type.
How to put on Peloton Shoes: I think it’s important that you install the studs when you assemble the Peloton shoe. To do this, you can put your shoes on and make a mark on the bottom of the Peloton shoe. Then, using the markers as a guide, insert the insoles into the bottom of your Peloton shoe. Peloton cleats can have Velcro straps or a closure system. Remember to loosen them first by pressing the button of the padlock and waiting for it to open. Adjust the buckle until you have enough holes to put your foot in. For shoes with Velcro flaps, you can remove the laces.
Peloton shoes are great inventions for bikers. However, since it is not the standard footwear that can easily be slipped in, there are important steps to follow.
Any thoughts on power transfer? I run mtb pedals on my road bikes and we get along just fine but would SPD SL pedals enable more power transfer and could I justify changing 3 sets of pedals and 2 sets of cleats? Thanks
There are so many variables. I feel I get more power out of the larger and flatter SPD-SL surface, but that could also be that I have some great Sidi shoes that are stiff as a rock. Would I get the same power transfer from upgrading my SPD shoes? Perhaps. But I have to say you likely get marginally more from the SPD-SL.
They are definitely not as convenient when on gnarly surfaces, though.
I use SPDs on my mountain bike and like them very much. So, I also put SPD pedals on my gravel bike (which I use like a road bike). My issue is finding light-weight, BOA shoes that accept the two-bolt system. Seem to be almost non-existent. They are all the bulkier heavier, mountain-bike style shoe. (I realize if I am going to use different shoes, I remove most of the benefit of staying with the same system, but I am comfortable with the style of cleat.) That said, I’m here because I am probably going to switch so I have greater choice in shoes.
I am getting ready to invest in clipless bike shoes and have been researching extensively. I have read over a dozen articles. This being the most well written and informative.