Von Collins is an accomplished triathlete and endurance cyclist, and the author of four fitness and training books: Smarter Running, Your First Triathlon Guide, Fit Foods, and 30 Rut-Busting Workouts. He has been cited as a triathlon, cycling, and fitness expert by Healthline, CNET, Forbes, Eat This, Not That and other major outlets.
Getting setup with your indoor biking system at home seems simple. You choose the device first. Smart trainer? Old-Fashioned trainer? Integrated, higher-end system like Peloton? You will make the right call, we are sure of it.
Then you choose the app or service that you want to use. If you went with an integrated system like Peloton, you are pretty much locked-in to that, making the choice easy. If you went with a smart trainer, you have a little more to think about. Do you commit to Zwift? A different app like Sufferfest or Trainerroad? Try a couple of them?
Of course, those more interactive apps don’t make a lot of sense if you have a basic, non-smart trainer. If that is the case, you can still get some killer, high-quality workouts, but they are best done with a set of DVDs or streaming videos. There are actually some really good ones that we love.
Here is our perfect setup for Zwift (or any other smart cycling app for that matter), which reflect many of the things I wish I would have had in my indoor cycling setup as a beginner.
The Bike
This one is easy. Use a regular bike, either the one you ride outside, or another one with generally similar geometry, saddle, etc.. It should be the star of the show. It might be your go-to road bike or tri bike, or whatever you plan to log miles on next summer.
You can also go the route of finding a basic, used bike to permanently have on the trainer. We know lots of really good cyclists that choose that route. There are pros and cons of course. It can be nice to be using your exact outdoor bike, as little things like the shifting and clipping-in will become second nature. At the same time, the indoor ride experience is different enough from an outdoor ride experience, given the muscles that don’t need to be used on stabilizing your body and the bike, so the main point is really to get your heart rate up and your quads burning. However, use the same style bike for sure — road bike, tri bike, etc.
We get some questions about if it is good for the bike to be on the trainer. Today’s smart trainers are pretty easy on the frame and dropouts. Old-fashioned trainers used to apply quite a bit of tension that made us a little uneasy, but today’s trainers are no problem, even on carbon fiber. With that said, if you have a $6,000 A-list bike, we can understand the desire to throw something cheaper on the trainer.
If you think you might spend some time in aero position on your outside rides, make sure you have the aerobars setup on your bike indoors, too. You want as close a simulation as is possible.
Finally, know that your bike will get lots of salty water (sweat) which will cause corrosion. Way more corrosion than riding outside. Because of this, you might want to clean it often, and even add some components that will resist corrosion. I know people who have brought their trainer-mounted bike in for a service and needed WAY more new equipment than expected, due to corrosion. If you are doing it right, you will sweat a lot! For this reason, you might also want to buy a used bike, adjust it to the exact same specs as your regular bike, and just leave it on the trainer full-time.
The Smart Trainer
We did an entire piece on smart bike trainers, so we won’t rehash every word of that. There are a couple main points that are important.
First, you want to buy the best smart trainer that fits your budget. If you will use this trainer often, like many of us do, try to stretch your budget. It is kind of like buying a mattress — do you really want to save $50 on something you will use several times a week for the next 10 years?
Second, you want to buy a trainer that is truly smart, which is not a problem in this day and age. There are many quality smart trainers on the market. No workarounds with the ANT+ cables if you don’t have to. This article, after all, is on the “Perfect Zwift Setup,” and we would never say the perfect Zwift setup involves anything other than a relatively new smart trainer.
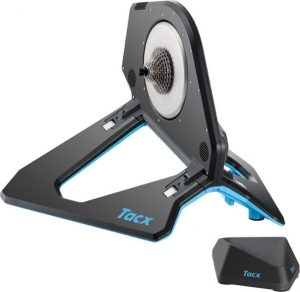
The trainer that we think is probably the best all-around smart trainer on the market right now is the Tacx Flux 2. It is very high-quality and will do everything you need, but a step below the uber-expensive models that can break the bank. A great go-to product, and you can find it here.
If a quiet trainer is your priority, you might want to spend a couple hundred more and get the TACX Neo model. It is a high-performing, smart trainer that will connect to Zwift effortlessly, but is known to be the quietest on the market. You can find it here.
Wheel Block
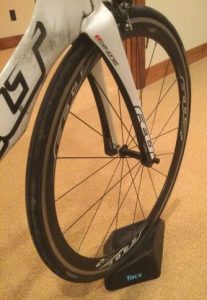
Most new trainers will come with a wheel block, also called a riser block, for your front wheel to set in to so you don’t get a lot of side-to-side action on it as you are cranking out at max wattage. If you did not get one with yours, you might want to order on. The block on a smart trainer is pretty subtle, unlike some of the older trainers where the wheel block is actually a pretty big piece of equipment.
A good, all-purpose wheel block, if you don’t have one, is the Wahoo product (here). Although, it is probably best to try to get the one that is an exact match to your smart trainer, so you are not at an odd angle. If you go with this one and it feels like, you can always cut it down if you are handy.
Of course, if you have the budget, you can always do the KICKR Climb Trainer. This allows you to remove your front wheel and mount it in a separate piece of equipment, giving you the total climbing experience when combined with the smart trainer in the back. Going up a hill? You will feel the entire bike angle up. Going down? The opposite will happen.
It adds $700 to your investment, and is totally optional, but then again, if you want the full experience…….. Find it here.
Training Mat
A training mat serves several purposes, as it sits under your bike during your workouts. It absorbs sweat. It might dampen some noise. If your chain has oil or grime on it, you might protect your floor from staining. And it actually gives your trainer and bike a bit of a firmer base so you don’t rock from side-to-side when going all-out.
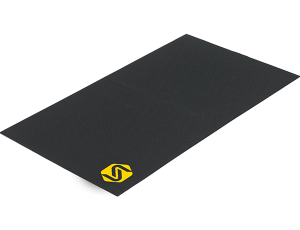
If your mat is positioned to be a sweat-catcher, be sure to wipe it down regularly or it may start to smell over time. Locker rooms smell the way they do for a reason, but you can avoid that.
Mats are mats, and you might get one with your trainer. If you don’t, we like the good-quality one from Saris. It isn’t so thick so as to be unstable, but it will give you everything you need in a mat. It cleans easily, too. We did an entire piece on bike trainer mats, here. Take a look if you want to go deep on the topic (the Saris is our top pick).
To Rocker Plate or Not?
Rocker plates — or bike trainer platforms — have really caught-on over the past 2 years, for cyclists who are looking for a more realistic ride feel. What is a rocker plate? It is a moving base that sits on the floor, but beneath your bike and trainer, allowing for more motion and a road-like feel while you ride. Want to sprint? You can get that side-to-side feel that you often do while cranking hard when you are on the road. Want to feel subtle shifts in your bodyweight while you crank? You will get that too.
We don’t think you need a rocker plate, but there are some advantages of using one.
Perhaps the best part about using a rocker plate is that the pressure your your saddle — from the contact point with your rear end — varies throughout the indoor ride. This creates an ability for you to go longer and be more comfortable, just like you would outside. When you are riding outside, the weight is shifted subtly throughout your saddle from minute-to-minute without you even knowing, allowing for more comfort over the long haul.
With all that said, nobody “needs” a rocker plate. We know many hardcore cyclists who have been riding indoors for years without one. But if you really want to deck out your indoor riding area and potentially allow you to do longer indoor rides, you should consider one. There are many instructions to be found online for making homemade rocker plates, but we think this could be dangerous unless you are quite handy and skilled at building things. If you have the budget, Saris makes a good all-around rocker plate, or you can save a few bucks and get one from KOM, here on Amazon. But our advice is that you really don’t need one, unless you have budget to burn and want to go all-out.
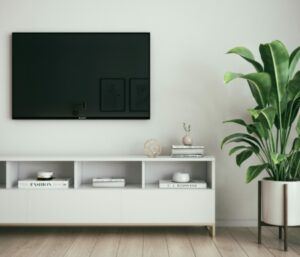
Mounted TV
You can use a computer or tablet for riding indoors, but I can attest that all those hours are a LOT more enjoyable if you have a larger TV mounted in front of you.
The ideal distance between a TV and you on your bike depends on the size of the TV. But we think a comfortable setup is a 40 inch TV that mounts anywhere between 36 and 60 inches from you as you ride. Further is fine, but they you might start to lose some of the detail depending on your eyesight.
TCL makes a great 40-incher that doesn’t break the bank and will do everything you need, here on Amazon.
Next, you need to mount it. There are two ideal ways to do that.
The one I do at home is on a moveable mounting bracket, connected to solid studs in the wall. Why not a fixed bracket? Because if this is a multi-purpose workout space, there might be times when you want the TV at standing eye level, and other times when you want it lower. When you are cycling, it sure it nice to be down in the aero or tuck position and not have to strain your neck up to see the screen. I use a simple swiveling mountain bracket that goes in to the wall studs (here on Amazon) that can move several inches when I am riding on my bike, but tucks back up flush in the wall for when I run on the treadmill.
If you really want to change the game, Vivo makes a mobile TV cart, a tripod design, that you mount your TV to. It is surprisingly sturdy, and the great thing is you can move it from room to room, or entirely out of the way when you are not using it. It actually holds a TV up to 65 inches. You can check it out here on Amazon.
Apple TV
There are many ways to stream your Zwift application, but I’ve written before that the best one is via an Apple TV. And since this piece is about the perfect Zwift setup, that is what I will endorse.
Why an Apple TV? Because of the ease. You simply navigate to the Zwift app on the TV screen, and go. The remote allows you to navigate, and it avoids the need to stream Zwift on a small screen or rely on bluetooth to mirror and image on the screen. Every step of transmission that you eliminate means that you will have a more direct, clearer experience with less latency.
I swear by the Apple TV, and I’m surprised that the other smart cycling app makers aren’t doing an Apple TV app.
You can see the Apple TV device at Apple.
Fan
Unless you have a workout room with a HVAC system that really cranks, you will probably want a simple floor fan nearby. When you take away the breeze of an outdoor bike, the wind against your face that cools you off even on a hot day, an indoor ride can get pretty toasty.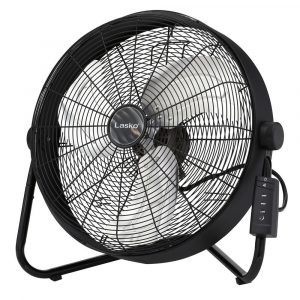
You can use whatever fan is back there in your closet, are you can buy a new one that is suited perfectly for this purpose. You can spend lots of money on a “headwind fan” but you don’t need to. A good quality fan like the Lasko floor fan (here on Amazon) is all you need. Plus, you can use it for other things when not cycling.
It also helps to choose some cooler, breathable top and cycling shorts. They will help the fan do its job to cool you off.
Dehumidifier (optional)
Many workout spaces would benefit from a dehumidifier, especially if it is one that doesn’t have windows or great natural airflow. Moist perspiration can increase the relative humidity of a small, unventilated space, and over time it can add up.
If your workout area is in a basement or doesn’t have natural ventilation, and especially if you aren’t the only one who uses it (perhaps your spouse uses a treadmill in the same space) consider running a humidifier generously.
Alternatively, running your fan for a couple hours after the workout can help, as a plan B.
Shelf or Table
I find that it is really nice to have a flat surface within easy reach of the bike while I am riding. It holds everything from my water, to an extra towel, so the remote for my Apple TV.
Use whatever setup works for your space. Perhaps you are able to find a high, small table that works, or bring in a stool to serve as an end table. Some bikes are setup close enough to a shelf so that it can be where you keep your stash. I happen to have my bike and trainer setup close enough to a treadmill so that the treadmill cupholders can hold everything I need within easy reach.
Of course, you might also need a table to hold your laptop or tablet in front of you (but not if you followed our “perfect” setup above and mounted a TV).
Either way, a great all-purpose, adjustable height table from Seville will serve many purposes, and do it well. Here on Amazon.
Headphones
You will want some headphones, unless you live alone with no neighbors. Sure, you can listen to the sound effects of your ride on Zwift, but we think you will far prefer listening to some great music of your choosing. We won’t recommend headphones here, because tech sites are better suited to do that. Just know two things: Make sure they are sweat-resistant, because you WILL sweat. And Know that if you use bluetooth headphones, the might interfere with your Zwift signal in some cases, especially with older headphones for some reason.
Water and Towel(s)
Self explanatory, but you will want plenty of water and a towel or two. We like to set the towel over the stem of our bike, so our sweat doesn’t drip into the screw holes on the stem and headset area and corrode them. As for water, we either keep it in the water holder (to help practice that reach and make it second nature) or set it on a nearby high table, if there is one.
If you are doing a hard or long ride, think about having more than one towel.
Gate (Optional – If you have Young Children)
We talk to some folks who get concerned about young children — toddlers, curious preschoolers) who will make quick moves toward the bike and trainer without the rider noticing. The same might be said of pets, although most pets know to stay away.
Just like with a treadmill, the spinning, moving pieces of a bike and trainer can be a bit mesmerizing for a young child, and the last thing you want is for them to get tangled up in a chain, or to touch a moving, hot flywheel from a trainer. If this is your situation, consider getting some kind of barrier like a pet fence to setup for those years. You can always discard it when the kids get a little older.


Nice write-up. Can confirm most of the things except
1) get a mobile holder and connect your smartphone using the app – it’s so much easier to shout “Ride on!” with it and chose your direction at crossings or do a U-turn to do that climb again.
2) the neighbours.. here they don’t complain about the music but about the noise from the trainer. (which is something you don’t get when you have a Neo2T or a kickr post 2019)
All the “cheap” and entry-level (mostly on-wheel) make a LOT of noise and therefore issues with my (under) neighbors (noise level broken washing machine)
thanks and take care
Great points! Yes, for those who enjoy the interactivity on Zwift with other rider, using the phone app is a must!
I think a change is underway that this article misses. You don’t need a bike, you don’t need a trainer, and you certainly don’t need a high end system like Peloton. All you need is a low-end freewheeling exercise bike that is fully Zwift compatible; that is, is bluetooth smart, with power meter, cadence meter, and software-controllable resistance built-in. The Renpho AI exercise bike does all that for $570 USD (using a $130 coupon). When it has more competition at that price range, cheaper freewheel exercise bikes will appear and overtake the dumb fixie flywheel spin bike designs, and Zwift will be overrun by an exercising crowd who may not even have a bike (like me), and maybe don’t even like outdoor cycling. Also, all you need to add is a heart rate monitor – assuming you already have a cell phone, fan, towels, and water bottle.
This article is awesome. Would say it is the ultimate guide to nailing your Zwift setup. Summarize into simple steps and explain things so well, even if you’re not techy.
I need to say I really like the Zwift hub, as it works with any other indoor cycling platform, such as Rouvy or Bekool.