Jim is an accomplished triathlete and endurance cyclist, and has raced in more than 35 USAT-certified races. He is also an avid trail runner and endurance gravel bike rider. Jim is a founder of Complete Tri and frequent writer on triathlon and cycling.
If you are cyclist and have not yet had a “road flat”, you will. If you are an experienced cyclist wondering how long it should take to change a flat tire, this article is for you. Getting a flat is a bummer, and disrupts your ride. All the more reason to invest in a durable bike tire, but even if you do there will inevitably be the occasional flat.
There are so many different things that can affect how long it takes to change a bike tire that it can vary tremendously. Much of it depends on the person involved and if they have changed a tire before. Someone who is experienced and has been riding for years, know exactly what they are doing it can take as little as 7 minutes, but a new rider who has never changed a tire, and never really worked on a bike before, it can take a lot longer, up to 20 minutes and perhaps more.
Cold weather changes often take longer, just because the rubber is stiffer, and so are your fingers! If you need to pull your cycling gloves off and change a tire in 40 degrees Fahrenheit, expect it to take just a bit longer.
Another thing that affects how long it takes is the tire itself, whether it is a tubeless or tubular tire or not can change things, and whether it is the front or rear tire that needs changing matters as well. With the front tire, removal is simple for anyone, a rear tire can be trouble for those not familiar with how the gear systems on bikes work as removing the rear wheel involves the chain mechanism. As for they type of tire, there are many different types of bike tires out there. This article is focused mainly on changing a clincher tire, which is the most popular kind.
Finally, having the right tools can make the job go much faster, so think about what to put in your bike bag. If you have a couple good tire levers, a nice new tube, and a couple CO2 cartridges that you are experienced using, the job can go pretty fast.
Fixing a flat is actually straightforward though, and is something every rider should master, so here are the steps:
Find a clean work area
Be sure you find a nice, clean work area, so you don’t introduce any debris into your tire. If you have a home bike workshop setup, you should always have an area set aside for these jobs that require a pristine setting. If you are working in a generally dirty area, look for some clean cardboard to set under the tire that you will be working on.
Remove the wheel
Undo the quick release and slide the wheel out of the bike, for the front wheel this is simple, but for the rear wheel take care with the chain, make sure to unhook it from the when first. Total time: 30-60 seconds.
Inspect for the puncture
Before taking the tire off the wheel, see if you can find the cause of the flat. Often this is a sharp object that has punctured through the tire and into the tube, and should be visible. Pull it out before doing anything else, you don’t want to leave it in the tire and puncture the new tube as soon as you inflate it. It is possible to have a hole in the tire but still be able to ride it on a new tube, assuming you have removed the source of the puncture. In this scenario, you will want to eventually replace the tire. Total time: 1-2 minutes.
Remove the tire

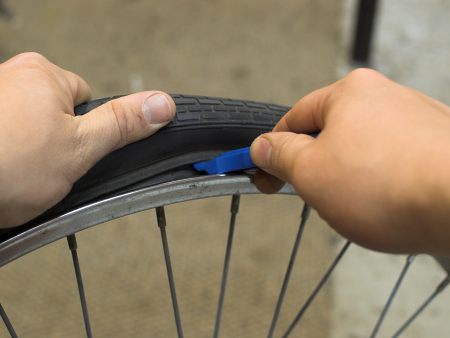
Next is taking the tire off the wheel, and for this you need a couple of tire levers. These are cheap little plastic “wrenches” intended for bike wheels without damaging them. Never use metal or a screwdriver! An aluminum rim is much softer than most metals and would bend or chip easily if you try to pry a tire off with the wrong materials. Carbon fiber is even more delicate — the wrong material used on it could really run a high-end rim.
This is the part that people often struggle with the first few times, but once you get the hang of it, you can do this in a few seconds. Take the first tire lever, and slip the flat end under the edge of the tire (called the bead), lifting it away from the wheel. Pull down to level it out from the wheel and hook the other end around a spoke to keep it secured in that position. Now take the other tire lever, using the flat end, insert it into the gap between tire and wheel you just made, and then slide it around the rest of the wheel to dislodge the tire all the way around. The first little bit is the hardest. Once loose, take the tire completely off, and then pull the damaged inner tube out as well. Total time: 2-3 minutes
Inspect the wheel and tire
If you hadn’t previously found the cause of the puncture, check the wheel and inside of the tire to find the problem and remove it. If the tube has two holes side-by-side, like a snakebite, then that is what is known as a pinch flat, caused by the tube not being inflated enough. Shake the tire in case a small rock got inside and caused the puncture. Note that if you see a sidewall blowout — a large gash in the side of the tire — it likely means the tire is destroyed. Short of some advanced hacks, it is unlikely you will be able to ride it home. Those are a small minority of flats, though. Total time: 1-2 minutes
Install the new tube
Put one side of the tire back on wheel, add a little air to the tube so it has some shape, and then begin tucking the new tube under the tire and seating it to the wheel. Start at the valve hole and work around until all the tube is seated to the wheel and inside the tire. Then, roll the other side of the tire back on the wheel, taking care not to pinch the tube underneath it at any point. Total time: 2-5 minutes
Inflate the tire

Inflate the tire to the required pressure using your pump, take it steadily and check the tire is seated properly as you go. If you are not carrying a pump (many don’t because even small ones can be bulky) then be sure you have CO2 cartridges. They are slick little capsules that allow you to easily pump a tire on the go. You put a little nozzle on the end and attached it to the valve. Unscrew the nozzle half a turn (other types require you to bend or push a button on the inflator) and the tire will begin inflating. Finally, reattach the wheel to the bike, again, if it is the rear one, ensure the chain is refitted correctly as well. Note that you should always pump the tire again when you are back home with a more reliable home bike tire pump – the CO2 cartridge is just intended to help you finish your ride. The tire is likely a bit underinflated. Total time: 1-3 minutes
Monitor the Tire
After you fix the flat, you will want to monitor the tire for the first few miles or riding, or the first day if the bike is not in use. It is possible that if the problem was due to a faulty valve stem, for example, that you might still have a problem on your hands. Generally speaking, bike tires should not go flat often. If you find yourself with a bike tire that keeps going flat, you probably need to do a bigger fix.
Supplies You May Want
A small kit of inexpensive supplies will help you fix a road flat whenever you have one. You don’t need to spend much — it is really just a cheap insurance policy that you really need to have.
- A spare tube. Make sure it has a compatible size with the tires you ride. Like this one.
- Tire removal tools. You can get by with one, we like to have two. It makes the job much easier. Like this one.
- CO2 nozzle. Compatible w/ the cartridge. Like this one.
- CO2 cartridge. They are not big. We like to carry two (you only need one nozzle, though) Like this one.
- Small supply bag. If you can carry this stuff in your backpack or jersey. Like this one.
Recommended Tire Pressure
Tires all require different pressures, and getting the PSI right is important for a couple reasons. First, it will help the tire perform as intended. Second, it will actually prevent future flats — because a pinch flat can be caused by your tire pressure actually being too low.
Here are our recommendations for the desired pressure for each type of tire, but always use the recommendation imprinted on the tire wall as your guide:
- Road or Tri Bike. Assuming you are riding a standard 21-25c width tire, 95 to 120 psi is right, depending on bodyweight.
- Mountain Bike. Mountain bike tires are meant to be inflated much less than a road bike. Go for 35 to 55 psi. This goes for pneumatic tires on bike trailers and kids bikes, too.
- Hybrid Bike. Hybrid, or commuter bikes, are usually somewhere in between Road or Mountain bike pressures. Common is 50 to 70 psi.
- Gravel Bike. A gravel bike, designed like a road bike but meant for different surfaces, should ride at less pressure than a road bike. We shoot for 65 to 85 psi, less if we expect a bumpy surface.
Note that most tires should be inflated a little more than normal if you plan to ride outside on a cold day. The tire will lose some pressure due to the lower temps.


Good Luck With That,! Go TUBELESS!!!! Duh…
I followed some tutorial videos on Youtube, and they all suck! After I applied your technique I successfully fixed the puncture on my tire and rode my bike to school.
Steps to Changing a Road Bike Tire: It is important to get the size of your wheels and measure your old tires. The first step to take in this process is removing the bike wheels. You must loosen the brakes, then locate the quick-release levers for easy removal. The next step is to take the tire away from the rim. To remove it quickly, you must completely deflate the tires first. Then, you can use tire levers to separate the tire and the rim. The fifth step is to pull out the tube from the inside of the tire. At this point, you can change a road bike tire: First, lay the new tube flat and inflate the tube moderately. Next, let the tube slide slowly into the tire and line up the tire tube valve to the rim’s valve hole. Finally, install the road bike tire onto the rim. The eighth step is to install the wheel back on the bike. Then, you are done.